Showing posts with label iOS. Show all posts

How to Enable Guest Mode in Google Chrome


Google Chrome is one of our favourite browsers on iOS, Android and Windows. We like it because it works well and allows you to easily import your preferences and other browser data across platforms. While there's no doubt about how useful this feature is, it can become a problem if you're not the only one using your computer.
If someone else takes your phone or computer and starts using Google Chrome, that person will have access to all your saved passwords. Another problem is that if you, like us, have spent some time setting up Google Chrome to suit your needs, then you might not want anyone else to change things. If you're signed in to Google Chrome via the same account on two devices, you remove an extension on one computer and it disappears on the other too. So it's not too hard to imagine a situation where someone deletes a whole bunch of important bookmarks and extensions, leaving you to set up the browser again.
In order to avoid this, you can enable guest mode in Google Chrome before handing your machine over to someone. This lets others use Google Chrome without messing around with your browser preferences. Here's how to enable it.

Windows and Mac
The steps to enable guest mode in Google Chrome are the same for Windows and Mac users.
  1. Open Google Chrome.
  2. On the top-right, you will see the name of the person whose Google account the browser is linked to. Click the name.
  3. Click Switch person.
  4. Click Browse as Guest.
  5. This will open a new window where you won't be able to access any of your browser data. Guest mode is like incognito mode, which doesn't save browser history or cookies. The only difference is that you can't even access bookmarks or other preferences.
Unfortunately, the solution isn't as straightforward on Android or iOS. The method described below is a bit cumbersome but it's the best possible way to do this as of now.
iOS
Follow these steps on Google Chrome for iPhone and iPad.
  1. Open Google Chrome.
  2. Tap the three vertical dots on the top-right.
  3. Tap Settings.
  4. Your Google account name and email address will be right at the top. Tap it.
  5. Tap Manage Accounts.
  6. Tap Use Chrome without a Google account.
  7. This will stop synchronising Chrome data on your iOS device with your Google account. Now on your iOS device, you can clear bookmarks or any other browser data you don't want others to change.
  8. When the other person has returns your iOS device, you can quickly get back all your data by signing in to your Google account again. Just follow steps 1-5 and then select your Google account or tap Add another account and sign in.
Android
  1. Open Google Chrome.
  2. Tap the three vertical dots on the top-right.
  3. Tap Settings.
  4. Tap your Google account name and email address that appear right at the top.
  5. Tap the blue button at the top to turn sync Off.
  6. This will stop syncing your data with your Google account. Now you can clear any preferences on Google Chrome for Android without disturbing the carefully configured settings on other devices.
  7. When you don't need guest mode anymore, you can quickly enable sync by following steps 1-4 and then tapping the button at the top to turn sync On.
For more tutorials, visit our How To section.

How to Backup Contacts on Your Smartphone


"I lost all of my contacts" is such a common complaint even in the age of smartphones that you have to sometimes wonder if people are faking it. But while it sounds silly and even unbelievable at times, the fact is that if you - or even your kid - accidentally hit the wrong buttons on the screen, you can accidentally deleting all your contacts.
If you've switched to a new phone, or lost your phone, or it stops working suddenly, you face the same problem. It has happened to almost all of us and it will continue to happen to others. The best you can do is ensure that all your contacts are backed up so that you can quickly get your life back on track. Here's how to do that on any smartphone.
iPhone
You can backup your iPhone contacts to iCloud or on your computer via iTunes. The iCloud method is simpler, but needs Internet access.
  1. Go to Settings > iCloud.
  2. The switch next to contacts should be in the green on position.
This single step will ensure that all your contacts are constantly backed up to iCloud. If you format your phone, just signing in to the iCloud account will restore all contacts.
If you don't have Internet access, you can still backup contacts via iTunes.
  1. Download and install the latest version of iTunes.
  2. Connect your iPhone to the computer via USB.
  3. Open iTunes.
  4. Tap the iPhone icon on the top-left, just below the menu bar.
  5. Tap Info on the left sidebar.
  6. Check Sync Contacts.
  7. Select the service you'd like to sync contacts with from the drop-down menu. On a Windows machine, we were allowed to sync with Outlook or Windows Contacts. The latter takes a local backup on your Windows machine.
  8. After selecting Windows Contacts, click Switch in the pop-up to start a backup.
This will backup your iPhone contacts to your computer. Windows Contacts isn't available on Windows 7, but you can install it via Windows Live Essentials. If you want to backup all that is there in your iPhone,

Android
If you have an Internet connection, follow these steps to backup your contacts on Android.
  1. Go to Settings > Accounts > Google.
  2. Tap the account name at the top.
  3. Make sure there is a check mark for Contacts.
All your contacts will be backed up to your Google account continuously. Note that the exact names of menus can vary between different manufacturers and Android versions. If you don't have Internet access on your phone, follow these steps.
  1. Open Contacts.
  2. Tap the three vertical dots on the top-right.
  3. Select Import/export.
  4. Tap Export to storage.
  5. A pop-up will tell you where your contacts will be exported. Tap OK.
  6. Open the file manager app on your phone. If you don't have one, you can download ES File Explorer.
  7. In the file manager, navigate to the folder where the contacts are stored. If you aren't sure, search for vcf and the contacts file will show up.
Copy this file and store it somewhere safe. If you ever want to get this set of contacts back then you'll need to use the import function in contacts, to import the data from this file.

BlackBerry 10
  1. Go to Settings > Accounts.
  2. Tap Add Account from the bottom of the screen.
  3. Tap Email, Calendar and Contacts.
  4. Enter your Gmail address and tap Next.
  5. Then enter your password and tap Sign in.
  6. This will set up the account. Make sure that Sync Contacts is On.
This will back up all your BlackBerry 10 contacts to your Google account. If you format the phone and then add the same Gmail address again, it will automatically populate your contacts list with the backed up numbers.
Windows Phone
There's nothing special that you need to do to backup your contacts on Windows Phone. When you first set up the phone, you will have to sign in using a Microsoft account. From then on, all your contacts are automatically backed up to the Microsoft account.
How do you backup contacts on your smartphone? Let us know via the comments. For more tutorials, head to our How To section.

How to Grant or Deny an iOS App Access to Your Location


Many of the apps you install ask for permission to access your location - and if the app seems useful, you're going to allow it more often than not. But we tend to forget about this afterwards, and over time, you've got a dozen different apps that are asking for location information and draining out the battery. For both privacy reasons and practical concerns about battery life, this kind of usage is a problem. Or sometimes it happens you deny an app location access on first launch, but you may need to enable it later, but are not sure how to go about this.
Some apps such as Zomato only use your location when you have the app open. Others such as Google Maps use your location even in the background. There may be a legitimate reason for this. In the case of Google Maps, it provides directions even when the app is not open. But that's not the case for all apps that use your location.
The easy solution is to just turn off the GPS altogether - but this means that even important apps you rely on can't check your location. If your battery life is getting worse by the day though, or if you're just not comfortable with certain apps sharing your location data, then you can turn off location access for just those apps.
Here's how to enable or disable location access for individual apps on iPhone or iPad.


  1. Go to Settings > Privacy > Location Services.
  2. Now scroll down to see a list of apps that seek location access.
  3. Next to each app, you will see the text NeverWhile Using, or Always. Apps that have Never written next to their names don't use your location data. While Using means that the app only accesses location data when it is on screen. Always means that the app can access location data even when it is not running.
  4. Tap any app that has Always displayed next to its name.
  5. Now tap While Using the App. This will ensure that the app doesn't use your location in the background. Some apps don't allow this option, in which case, if you don't think that the app should always access your location, change the setting to Never.
  6. Scroll to the bottom and tap System Services.
  7. Now you can see system services that use your location in the background. Find My iPhone is a useful anti-theft feature, so you should not deny it location access. You can turn the others off depending on your requirements.
Do you prefer to have apps using your location in the background? Did denying location access improve the battery life on your iPhone or iPad? Let us know via the comments.
For more tutorials, visit our How To section

How to Automatically Delete Old Text Messages on iPhone, Android


Is your smartphone taking too long to load the text messaging app? Has the text message app begun stuttering when you scroll up or down the list of messages? Is your phone's memory almost full and you need to get rid of some of that digital clutter? If your answer to these questions is yes, then you should consider automatically deleting text messages.
Most of us get far too many text messages to manually delete each one of them. On our first Nokia feature phones, we could only store 100-odd messages in most phones, so we kept a close eye on all incoming messages. Today though, storage restrictions have seemingly vanished and the messages began piling up in everyone's phones. That led to another set of problems - laggy messaging apps and storage woes. Reducing the clutter is actually pretty simple - you can set your phone to automatically delete old messages. This is how.
iPhone
On the iPhone, you can set the device to automatically delete all old messages. The only problem is that you can't make any exceptions - you can't change a setting that would allow all messages from a particular sender to stay even past the expiry date. If you want to save any information from a message, we suggest keeping a clipping in an app like Evernote. To set up automatically cleaning old messages, this is what you do:
  1. Open Settings > Messages.
  2. Scroll down to the section labelled MESSAGE HISTORY.
  3. Tap Keep Messages.
  4. Choose either 30 days or 1 Year. This will delete messages older than one month or one year.


Android
Android can be a little more complicated than the iPhone, simply because there are a lot of variants available. The version of Android, and the customisations your smartphone comes with, both play a part. However, Google's Hangouts app can now be your default messaging client, and it allows you to automatically delete old messages,
To use Hangouts as your SMS client - if you're not already - you need to do the following:
  1. Open the default messaging app - Hangouts.
  2. Tap the three horizontal lines icon on the top-left.
  3. Tap Settings.
  4. Tap SMS.
  5. Tap SMS Disabled and then tap OK. This can take a few seconds to complete after you tap OK.

Now, to automatically delete messages from Hangouts:
  1. Scroll down to the ADVANCED section.
  2. Check Delete old messages. This will delete old text messages from your phone when the memory is low.


While that's useful, some Android manufacturers do allow you to save individual messages as well. This did not work with a Moto E, a Micromax Canvas 2 or a Gionee Elife E5, but did work with an LG G3, so your mileage may vary. Here, we used the manufacturer's SMS app. This is how you can save messages, and delete old messages:
  1. Open the SMS app.
  2. Tap the three dots button in the top right.
  3. Go to Settings > Storage.
  4. Tick "Delete old messages" and in the drop down menu below, set the limit on the number of messages each conversation can have.
If you want to save an old message from being auto deleted, long press the specific message in the conversation, and tap Copy to Saved box.
Unfortunately, this feature is not there on all phones by default, so you'll need to experiment with your device to see if you have this option. Automatic deletion of old messages is clearly useful, but it could also use a few advanced tweaks to make it even better, on both iOS and Android. If you use any other method to automatically delete old text messages, let us know via the comments. For more tutorials, visit our How To section.

How to Switch Off and Turn On iPhone, iPad With a Damaged Power Button


If you're an iPhone or iPad user, then you might not realise just how much you end up using the power on your phone. The home button is essential to navigate through your device, and the use of the volume buttons and the mute switch on the side is pretty obvious too, but if your power button stops working, you can't turn your phone off - or back on again for that matter.
It's also pretty easy to damage, with external factors such as excess humidity or dust that can make it stop working. You can get by without switching off the iOS device, but it is always good to be able to turn the phone off if needed. These simple steps to switch off the device without touching the power button could come in really handy.
  1. Open Settings.
  2. Go to General > Accessibility.
  3. Scroll down to the section labelled INTERACTION and tap on AssistiveTouch.
  4. On the next screen, toggle AssistiveTouch to the green On position.
  5. A white circle with a grey box will appear on screen. Tap this circle to expand it to a big box on screen.
  6. Tap Device.
  7. Tap and hold Lock Screen until the red-and-white power icon appears on screen with the text slide to power off next to it.
  8. Slide the power icon to the right to switch off the iPhone or iPad.
That takes care of switching the device off, but what do you do if you want to turn it back on? If the power button is damaged, how else can you switch on an iOS device? The answer is - charge the device. Yes, just connect it to a power socket or to a USB port on any computer. The device will turn back on in a few seconds. As soon as the white screen with the Apple logo appears, you can disconnect the charger or USB cable.
Have you used any other creative ways to switch off or turn on your iPhone or iPad? Let us know via the comments. For more tutorials, head to our How To section.

How to Add Touchscreen Home Button on iPhone, iPad


The home button is the biggest button on iOS devices and probably the most important one. It's a great example of what makes the iPhone and iPad so easy to use - that single button will always take you to the homescreen no matter what you're doing. On many Android devices, home is a software button that disappears inside apps, leaving you feeling stuck, but the physical home button on iOS devices is always there. At the same time, power users can double and triple tap the button for additional functions.
Unfortunately, this extensive usage means that the home button can become unresponsive. This can really make using the device frustrating, particularly if you're using an older device that doesn't support gestures. If you're facing the same problem, then you should enable the software home button option on your iOS device. This is how you do it:
  1. Open Settings.
  2. Go to General > Accessibility
  3. Scroll down to the section labeled INTERACTION and tap on AssistiveTouch.
  4. On the next screen, toggle AssistiveTouch to the green On position.
  5. A white circle with a grey box will appear on screen. Tap this circle to expand it to a big box on screen. The square Home button at the bottom of the box functions exactly like the physical home button - you can use it to single tap, double tap, or long press the home button even if there is a hardware problem. The grey box remains visible and usable in all apps.

This is a simple and effective fix for an unresponsive home button. Does your iOS device have an unresponsive home button? How did you deal with this problem? Let us know via the comments. For more tutorials, head to our How To section.

How to Remotely Control Your Computer From a Phone or Tablet


Your dad is having an issue with the computer at home but in spite of giving him instructions for an hour, he can't seem to fix the issue. One way to make sure he's actually following the steps you're dictating over the phone would be to use his phone as a webcam to quickly look at the screen, but an even better option would be to just take over his computer from your phone or tablet, and resolve things yourself over the Internet. How do you do that? That's where we step in. Read on:
  1. The first thing that's needed is a little foresight. Download and install TeamViewer on your parents' computer now, and on your smartphone or tablet too. TeamViewer is free for personal use on Windows, Mac, Linux, iOS, Android, Windows Phone and BlackBerry, and you can find the download links for all these platforms on the TeamViewer page.
  2. Make sure both the computer and the phone are connected to the Internet.
  3. Open TeamViewer on the computer.
  4. Note down the ID and password that's displayed in TeamViewer - or have someone tell it to you on phone.
  5. Fire up TeamViewer on the smartphone or tablet.
  6. Enter the ID and password you noted down earlier in the smartphone/ tablet TeamViewer app.
  7. Tap Remote Control.
  8. Now you'll see the computer's screen on your phone or tablet. You can control it easily now.
TeamViewer works across the Internet, and not just when the two machines are connected to the same network, so you can now troubleshoot problems on your parents' computer right from office, or if you've installed the program on your home desktop, you can access your files and send those emails you were supposed to have saved to your laptop. You can tap on the screen to simulate a mouse-click, and if you tap on a text entry field, a virtual keyboard pops up so you can type.
There can be a little delay in what you're doing on the mobile and what's happening on the computer, depending partly on the speed of both Internet connections, so it's not the same as being there, but if you just want to troubleshoot something urgently, or if you need to get some important work finished, TeamViewer can be a lifesaver.
There are many more remote connection apps that let you control your computer via your phone or tablet, but we picked TeamViewer because it is extremely easy to use, as you can see from the steps above. TeamViewer is also free for personal use, so that's an added advantage.
Which method do you use to control your computer from your smartphone? Let us know via the comments. You can always find more tutorials in our How To section

How to Access Blocked Websites


While we do not condone piracy on blog, truth is 'blanket bans' often cause legitimate websites to get blocked as well. This is where this little guide will come in handy.
Before trying the methods we've described, make sure that the website has been blocked and is not down. Is It Down Right Now is a fairly reliable website for this. Just open it and enter the name of the website in the form and click Check. It will tell you if the website is down just for you or for everyone.
If the website you want to access is not down but you still can't open it, here are some quick ways to work around the blocks. Note, that one or more of these method(s) may not work for you, if your ISP is not using DNS blocks, for example.


Free Website Monitor

Android App : https://play.google.com/store/apps/details?id=com.freewebsitemonitor


A Simple URL Change
The first thing you want to try is changing the url to https instead of http. Doing this is easy, just follow these two steps.
1) Go to the address bar of your browser.
2) If you want to access "http://blockedwebsite123.com", change it to "https://blockedwebsite123.com" and reload the website. This may not always work, but some users have reported that this has worked on some websites.
Change the DNS
If the URL change doesn't work, then you might want to try changing the domain name server to Google DNS or OpenDNS. Most people have reported that this method works on BSNL for them. Here's how you can do that on any device.
For Windows Vista, 7 or 8 users, here are the instructions.
1) For Windows Vista and 7, click Start > Control Panel > Network and Internet > Network and Sharing Center. If you're using Windows 8, hit Windows key + C > click Search on the right-hand side > type Control Panel in the search bar > select Control Panel > Network and Internet > Network and Sharing Center.
2) Click Change adapter settings, which is on the left sidebar.
3) Right-click the Internet connection (MTNL, Airtel, BSNL, etc.) on which you're having trouble accessing websites, and click Properties.
4) Select Internet Protocol Version 4 (TCP/IP), and then click Properties.
5) Click the radio button next to Use the following DNS Server addresses. If you want to use Google DNS, enter 8.8.8.8 as the Preferred DNS Server and 8.8.4.4 as the Alternate DNS Server. If you want to use OpenDNS, use 202.67.220.220 and 202.67.222.222 respectively. After entering these, click OK.


For Windows XP users, these are the steps.
1) Click Start > Control Panel > Network Connections.
2) Now select your specific Internet connection with access problems, right-click, then select Properties.
3) Left-click Internet Protocol (TCP/IP), and select Properties.
4) Follow the instructions in Step 5 above.
If you are using an iOS device that's connected to a Wi-Fi network, try this.
1) Open Settings > tap Wi-Fi > tap the Wi-Fi network the device is connected to.
2) Tap DNS and change the two values to Google DNS or Open DNS (explained in step 5 above). These two values should be separated with a comma and one space (8.8.8.8, 8.8.4.4).
For Android users, these are the steps.
1) Open Settings > tap Wi-Fi.
2) Long press the Wi-Fi network you're connected to > tap Modify Network.
3) Now tap the box next to Show advanced options. Scroll down.
4) Tap DHCP > select Static IP > scroll down and modify DNS 1 and DNS 2 (as explained in step 5 above).
On BlackBerry 10 devices, try this.
1) Settings > Network and Connections > tap Wi-Fi. Now connect to a Wi-Fi network.
2) Long-press the connection you're connected to > tap Edit.
3) Scroll down and turn off Auto Obtain IP. After you do this, you'll see more options, such as the IP address, DNS and gateway. Switch to OpenDNS or Google DNS here (as explained in step 5 above).
Unfortunately, Windows Phone 8 doesn't support changing DNS manually.
Try a Proxy
If changing the DNS does not work, you should try a Web proxy to open blocked websites. These websites simply route you through servers based in other countries, which means that you can access websites that aren't blocked in those countries.
Hidemyass and NewIPNow are two such websites. Just enter the name of the blocked website in the form and click enter. On the Hidemyass website, the free proxy is at the very bottom of the page, after a lot of links to the paid version, but just scroll all the way down and you'll see the address bar. NewIPNow lets you choose your server's location (US, UK or Canada), which may be useful for some users.


Subscribe to a Virtual Private Network
For complete anonymity on the Web and to be able to access all websites blocked in your country, a virtual private network (VPN) is the best solution. The best VPNs are not free. If you really need privacy or want to avoid proxy websites, you can try Private Internet Access at $7 (Rs. 420) per month, or TorGuard at $10 (Rs. 600) per month.
If we've missed your favourite method to open blocked websites, let us know with a comment. For more tutorials, make sure you visit our 'How to' section.


Free Website Monitor

Android App : https://play.google.com/store/apps/details?id=com.freewebsitemonitor

How to improve battery life on iOS 7.1


If you've upgraded to iOS 7, you might be experiencing reduced battery life. According to multiple posts across the Web, including Apple's own tech support forum, battery life is impacted to different extents for different people. For those who are struggling to make it through a day on a single charge, here are a few tips:
Turn off all non-essentials
Bluetooth and Wi-Fi are the most obvious candidates when it comes to battery depletion. If you aren't turning them off altogether when not needed, make sure your iPhone or iPad isn't unnecessarily connecting to Wi-Fi networks and Bluetooth accessories by deleting them from the lists of previously paired devices.
Turning off cellular data would mean that you won't receive email notifications, Whatsapp messages or any other app alerts, but it will also vastly improve your battery life expectancy. To do this, go to Settings > Cellular and move the Cellular Data slider to the left, switching it off.
For a less drastic approach, you can decide which individual apps are allowed to send and receive data when your phone is idle. Go to Settings > General > Background App Refresh to selectively choose which apps are allowed to refresh themselves using your Internet connections.
Apple's mobile OS also uses background data transfers for things like syncing iTunes purchases, iCloud backups, and Photo Stream. Turn these off if you don't need them - of course iCloud is pretty handy, so don't kill this unless you really need to.
App notifications also require Internet access, so turning some of these off will help you manage power consumption. Go to Settings > Notification Center and disable spam magnets such as games and commercial apps.


AirDrop doesn't require Internet access, but it could be using your Bluetooth and Wi-Fi radios to check for compatible devices near you. Turn it off via the Control Center, which is accessed by flicking upwards from the bottom of the screen.
While you're in the settings, go to Privacy > Location Services and check which apps have recently used GPS. Turn off location services for apps that don't need it, such as promotional ones that try to detect when you're near a brand outlet.
Another very simple thing to do is to manually exit apps that are running in the background just to be sure they aren't silently wasting energy when they aren't supposed to.
Dispense with the eye candy
iOS 7 famously introduced a number of visual effects, including animations for most screen transitions and wallpaper that shifts around as you tilt your device. These can be turned off from Settings > General > Accessibility > Reduce Motion.
Of course, one of the easiest ways to manage power is to turn the screen brightness down. Control Center makes it quick and easy to adjust brightness on demand, so you can turn it up only when needed, and make sure that the automatic settings isn't too wasteful.

Reset, Restore, Reinstall
If none of these tricks work, or if you're sure that battery usage is way above normal, you can always try resetting your phone. In some cases, users who upgraded to iOS 7 and/or 7.1 on their devices themselves reported improvements after resetting and restoring via iTunes on a computer.
The least disruptive step is to reset all settings, via Settings > General > Reset. This will leave all your apps and data intact. Choosing Erase All Content and Settings instead will reset your phone to factory condition. For a full reset, plug your device into a PC or Mac and use iTunes to reset it. Doing this will install a fresh copy of iOS 7.1 on your device.
Final words
More importantly than any of this, charge your device only when necessary and don't leave it plugged in long after it reaches 100 percent. Cycle the battery completely every now and then, and allow the device to cycle a few times after the iOS 7.1 update so that the battery indicator is properly calibrated.

How to Turn Off Automatic App Updates in Android, iOS, Windows Phone 8.1, Windows 8.1


Many smartphone users download far too many apps for them to keep updating each one manually. Luckily, the major app platforms all have automatic app updates now, and the default setting for this is 'On'. This means that your apps will remain up to date with all the latest features and bug-fixes that the developers come up with, without you having to do a single thing.
And these days apps roll out bug fixes faster than you can say, "update", so keeping the app updates on automatic makes a lot of sense. But there are some major drawbacks involved as well, and these might cause you to rethink your automatic update policy.
For one thing, if automatic updates are enabled and not just limited to Wi-Fi, then you could end up inadvertently spending huge amounts of money as every small update is downloaded over your 3G connection.
Aside from that, constantly transferring data and updating the software also keeps the phone running, and keeps your battery running down a lot faster than you were expecting - turning automatic updates off could give you that little extra time you always find yourself needing.
And then, of course, there are the changes to software that you didn't want in the first place. Sometimes bugfixes add more bugs, and sometimes new features aren't improvements at all. There are times when you will discover that an app has updated and then find yourself wishing that the old version were still around.
For example, we're big fans of the iOS game Crossy Road - or were, until the latest update. We were playing it happily on an iPad 3 until it auto-updated. Since the update, the game started lagging on the iPad and became frustrating. Monetisation features in the game have also become more aggressive and get in the way of an otherwise great experience.
Such a thing can happen to any app and does give you a good reason not to update automatically. The adage "If it ain't broke, don't fix it" holds true. If you've faced any such situation and want to stop updating apps automatically, follow the steps in this guide.
Android
Android gives you a fair amount of freedom about updates. You can turn off all updates, or limit updates to Wi-Fi downloads only. You can also enable updates for only specific apps - so for example, you might want the latest versions of apps you use very frequently, but you don't want to waste bandwidth downloading updates for other apps that will be launched only once every three months.
To turn updates on or off, follow these steps:
  1. Open Google Play.
  2. Tap the hamburger icon (three horizontal lines) on the top-left.
  3. Tap Settings.
  4. Tap Auto-update apps.
  5. To disable automatic app updates, select Do not auto-update apps.
  6. If you want to instead auto-update apps only when you're connected to a WiFi network, tap Auto-update apps over Wi-Fi only in the same pop-up.
Android also lets you choose which apps you want to update automatically.
  1. To turn on auto-update for any app, go to the app page in the Google Play app.
  2. Tap the three vertical dots in the top right.
  3. Check Auto-update.
This way, you can disable automatic updates and still keep chosen apps ready with the latest versions.


iOS
On iOS, you can choose to either have automatic updates on or off, and if on, you can choose whether or not to use your mobile connection to download apps. There's no way to disable automatic app updates for individual apps on iOS - this means that either all apps will update, or none. If you want to stop all automatic updates, the steps are simple:
  1. Go to Settings > iTunes & App Store.
  2. To disable all automatic app updates, turn off the green switch next to Updates.
  3. If you want to automatically update apps, but only when you are connected to a Wi-Fi network, leave updates on and turn off Use Mobile Data instead.

Windows Phone 8.1
Like iOS, Windows Phone 8.1 also lets you choose whether or not to update all apps, or to update them only on Wi-Fi, and not on cellular data.
  1. Open Store.
  2. Tap the three horizontal dots icon on the bottom-right.
  3. Tap Settings.
  4. Tap the switch next to Update apps automatically to turn it off.
  5. You can instead turn on Only get updates over Wi-Fi to avoid unnecessary cellular data charges.
Windows 8.1
The settings for the Windows 8.1 app updates are very similar to Windows Phone 8.1. If you have a Windows 8.1 machine, you can follow these steps to disable automatic app updates.
  1. Open Store.
  2. Swipe from the right edge of the screen (or press the Windows Key + C) to reveal the Charms Bar.
  3. Tap Settings.
  4. Tap App Updates.
  5. Tap the button below Automatically update my apps to change it from Yes to No.
Have you disabled automatic updates on your smartphone or tablet? Why did you do so? Let us know via the comments. For more tutorials, visit our How To section.

How to Stop Google From Tracking You on the Web


You probably know that websites keep track of how you're using them, and even the sites that don't require you to sign up with an account can keep a track of your preferences and behaviour using cookies. But the biggest networks, like Google, and Facebook, keep tracking you even when you're not signed in and follow you around the Internet to serve you with "relevant" advertising and content. And since most of us will have signed up for at least one of Google's many popular services, that's the company that has the most information. Not everyone is comfortable with the idea of one company knowing so much about them. If you're one of these people, read on to find out how to minimise Google's tracking online.

Please note that this is not a guide for blocking advertisements. You will still get served advertising - it just won't be personalised by tracking your online behaviour across the web. Here's what you need to do:
Disable Tracking
This is the most important part of this guide. If you've noticed the same ads following you no matter which website you visit, it may be because Google is tracking you. Thankfully, Google makes it very easy to disable tracking. Go through these steps to protect your privacy.
1) Google has a page for advertisement settings. Visit it and sign in.
2) Here you will see two columns, one for advertisements you'll see on Google's websites and one for the advertisements you'll be shown on the Web. Based on your data, Google will have estimated your gender, age, languages you speak and your interests. Scroll down to Opt-out settings and click Opt-out in both columns. You'll notice that the data above will be replaced by N/A.
3) Google's advertising cookie is still tracking you. To remove it, head to the Advertising cookie opt-out page and click Download the cookie opt-out plugin. This plugin is available for Chrome, Internet Explorer and Firefox. After downloading this plugin, Google will stop tracking your browsing activity.

Disable Search History
While that stops the direct tracking, Google is still gathering a lot of information about your behaviour. Whether you're using Gmail, or YouTube or Google itself to search for things, you're giving the company a clear trail of browsing data. The good news is that you can stop it from doing so easily. This is how:
1) Head to Google's account history page and sign in.
2) You will see four large cards (Things that you search for, Places you've been, Your YouTube searches, and Things that you've watched on YouTube). Each one of these will have a Pause button near the bottom-right and a Manage history link on the bottom-left.
3) Click Pause on all four tiles. This will stop Google from recording your personal data.
4) To remove the data that Google has already recorded, for each tile, click the Manage history link, then select the items, and click on "Remove items" to delete it all.

Disable Shared Endorsements
Last year, Google unveiled a new way to make advertisements more appealing - showing your Google+ activity next to advertisements. Here's what Google says about this, "To help your friends and others find cool stuff online, your activity (such as reviews, +1's, follows, shares, etc.) may be used along with your name and photo in commercial or other promotional contexts." If you'd rather not endorse products or services in advertisements posted on the Web, follow these steps.
1) Go to Google's shared endorsements settings page and sign in.
2) Now scroll down to the bottom and remove the uncheck the box that reads, "Based on my activity, Google may show my name and profile photo in shared endorsements that appear in ads."
3) Once you've removed the tick-mark, click the blue Save button. That's it.

For Android, iOS Users
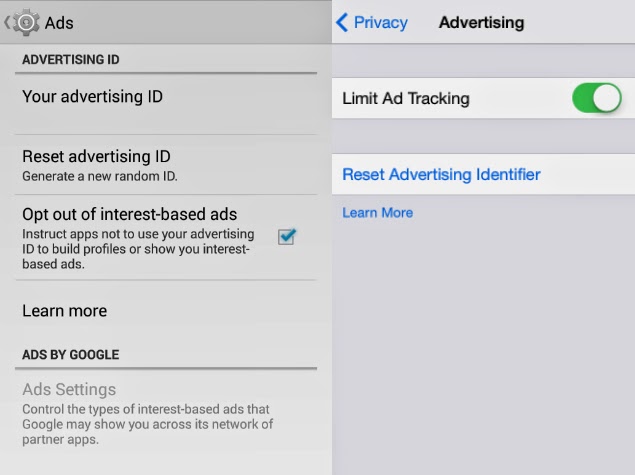
If a smartphone or tablet is your preferred device for browsing the Web, you can take a quick peek in its settings to disable tracking. On Android, head to Settings > Accounts & Sync > Google > Ads (on some devices, Google may appear in the Settings app itself). Now make sure that there is a check-mark next to Opt out of interest-based ads. On iOS, go to Settings > Privacy > Advertising and turn on Limit Ad Tracking. This will stop websites that serve advertisements from tracking your browsing activity.

Switch from Google
Still worried about your browsing history being tracked to deliver search results on the Web? Try DuckDuckGo, a search engine that respects your privacy. It doesn't tailor search results based on your interests or the websites you frequent. DuckDuckGo recently added several new features such as instant answers. Apple's iOS 8 supports DuckDuckGo and users will be able set it as the default search engine on their iOS devices.

These steps should have helped you keep Google from tracking your Web activity. If you have any other suggestions, reach out using the comments section below. If you like this article, you might want to visit our How to section for more such useful articles

How to Install Multiple Apps on Android, iOS, Windows, Mac, and Ubuntu


You've got a new iPhone, iPad or any other gadgets and you're very excited about it, but before you can begin using it properly you'll have to spend hours installing all your favourite software. If you could automate the installation process, you'd save a lot of time and get straight to doing what you bought the machine for. Here are two great services that let you quickly install a lot of apps on Windows and Mac and two tricks to do the same on Android and iOS devices.
Windows and Ubuntu
If you use a Windows computer, you must try Ninite. We tried a few other alternatives and found that these apps try to serve too many ads, sponsored apps, or run in the background in your system. Ninite is free, has no ads and gives you a single exe file that you can delete after installing all your apps. That is why it is better than the alternatives. Windows machines that have never been formatted or restored to factory settings are rare. Windows also happens to be the operating system on a large number of new computers around the world. In a nutshell, a lot of people are spending a lot of time installing the apps that let them make the most of the operating system. If you want to make it a single-click, hassle-free process, follow these steps.
1. Go to Ninite and scroll down. You'll see several apps in categories such as Utilities, Browsers, etc. Ninite lists several great, free apps for Windows such as Glary Utilities, VLC Media Player, Avast anti-virus, Dropbox and LibreOffice. The Ninite home page has the full list of apps sorted into categories such as browsers, messaging, media, imaging, security and more. Most people won't need any app other than the ones listed on Ninite.
2. Select all the software you need by checking the boxes next to them > click the big green Get Installer button.
3. Ninite's installer (usually less than 1MB in size) will begin downloading now. Once that's done, run it. It will automatically start downloading all the apps and install them. Ninite also removes all the adware (toolbars, search engine defaults, etc.) that some apps try to make you install. This only works for desktop apps, not Windows 8 style apps.
Ninite is also available for Ubuntu Linux, but the selection of apps is a lot smaller than Windows.

Mac
Unlike Windows users, those on Apple's Mac operating system get a good collection of pre-loaded apps. Yet, if you want to quickly install some of the most popular third-party apps on Mac, these steps will help.
1. Open Get Mac Apps > select the apps you need > click "Install These!"
2. This will generate a command. Copy it.
3. Open Terminal. If you don't know how to do this, hit Cmd+space > type Terminal > press Enter.
4. Paste the code in Terminal > hit Enter.
5. That's it. In case you're wondering whether Get Mac Apps has good apps, the collection is quite good - featuring free apps such as Flux, Skype, VLC, Handbrake, Dropbox, Evernote and Notational Velocity, among others.
Note that both Ninite and Get Mac Apps use the official sources of the apps, so they are safe to use.

Smartphones
You can also install multiple apps easily on smartphones, but these methods will not work if you want to install new apps. They work only with apps you've previously installed or purchased from the same Apple ID or Google account. This method is useful if you have a set of essential apps that you always install every time you get a new device, but not if you are using a new Apple ID or Google account.
Android
If you have an Android device, just go through the following steps to install several previously installed apps quickly.
1. Open Google Play Store > tap the three horizontal lines on the top-left > My Apps > All.
2. Tap and hold any app that doesn't have "Installed" written next to it. This will select the app. Now scroll down and select all the previously purchased apps you want to install > tap the Install button at the top.
3. All these apps will now be installed, though you will have to negotiate through the permission screens for each app and approve it individually.

iOS
Unlike Android, iOS doesn't have an option where you can select all previously purchased apps and do a one-tap install. But Apple's method is much faster. Check these steps and see it yourself.
1. Open App Store > tap Updates > Purchased.
2. The apps you have installed will have an "Open" button next to them. The ones you haven't installed will have a cloud icon with an arrow pointing downwards. Tap that icon for all the apps you want to install and your iOS device will start downloading them - no password required.


These methods are great for quickly setting up your new device, but if you prefer any other ways or services, let us know with a comment. We have more useful tutorials in our How to section, which you might want to visit.

How to Browse and Search the App Store Without iTunes


The App Store for iOS and Mac is a great place to find new apps for your Apple devices, but its search algorithms aren't the best. iTunes doesn't have advanced search features, and many people don't care for the software at all. Thankfully, you don't need to deal with iTunes to browse and search the App Store.
Not many people know this, but Apple's official website offers you a way to browse the iOS and Mac App Stores (US catalogue). You can look through various sub-categories such as Books, Games and Productivity, to see the popular apps in those categories, or go through the alphabetical list of apps in each category.
However, that can get tiring very quickly and the official site does not have a search function for apps, which is a problem. There are also several third-party websites such as 148apps, Appshopper and Toucharcade that will let you search for apps. However, these sites are really geared towards discovery of new and on-sale apps and not search, and they also include news and reviews. If you're just interested in searching for apps, then these sites not the best choices.
If you know the name of the app you are looking for, one way to find its description page is to use the site operator with Google. However, this can return a lot of irrelevant and duplicate results since app listings from various country-specific iTunes stores are likely to show up as well.
If you want better App Store search without using iTunes, these two websites will serve your purpose.
Fnd
While the official website serves for browsing through the App Store, if you're trying to find something specific, then Fnd is a much better option. It has a much more robust search, and it lets you choose the country you want results from as well. This is what you need to do:
1. Open the Fnd website > enter your search query in the big search bar > hit Enter.
2. Now you'll see the top three search results in apps, music, movies, TV, books, Mac and podcasts. To see more results in any of these categories, you can either click the tab for the category, which is above the search results, or links such as "More Apps" that appear after the three results from the category.
3. Each search result has the name of the app in green and below that, you'll see the app's section, such as Social Networking. Next to this section you may see a tiny rectangle and/or a big rectangle. This is Fnd's way of showing whether the app is available on iPhone, iPad or both.
4. Clicking the name of the app in Fnd's search results shows you the app's App Store listing and YouTube videos related to the app. To the right of each search result and app listing is a box with a blue outline. This box mentions the price and has a small App Store icon. Click it to navigate to the app's page on Apple's website.
5. On the Fnd.io homepage, you can click the three horizontal lines on the top right to browse the App Store charts. You can search for top free apps, top paid apps and top grossing apps on the US App Store. On the top left of the homepage, click the country flag and select your country to search the App Store in your region.
Vionza
If you're looking for a specific app or want to browse the store, then these two methods are good enough. If you want fine control over the search results, then you need to use Vionza. For instance, if you want to only see apps priced between $0.99 and $3.99, or apps rated more than 4 stars, then Vionza is the best choice. This is how you make use of it:
1. Head to Vionza's iOS App Store search page. If you want to search for Mac apps, click here.
2. Type the name of the app in the search bar > hit Enter or click Search. Now you'll reach the results page. On the left-hand side, you'll see sliders for price and ratings.
3. Adjust the sliders to the price range, and rating range that you're looking for. For example, you could set it to find only free apps, or only top rated apps, or any combination in between.
4. Above the sliders, you will see two headers - Sort Apps By and Device Type. Here you can arrange results by relevance, name, price or rating. You can also filter results by device type - iPhone-only, iPad-only or universal apps.
5. Vionza only lets you search App Store pages from five regions - Australia, Canada, Germany, US and UK. Sadly, the Indian store isn't supported so you won't be able to see price in rupees.
6. Unlike Fnd and iTunes Preview, Vionza doesn't let you see App Store charts.
Both Vionza and Fnd work as advertised on mobile browsers too. If you want to search for iOS apps from an Android device or without opening the App Store app, either of these two services should do the job. We tried a few other services, but these were the best ways to search the App Store - if you have a better alternative, please let us know via comments.
For more such useful articles, you can visit our How to section.