Showing posts with label Microsoft. Show all posts

How to Reserve Your Free Windows 10 Upgrade


Microsoft Windows 10 is going to be released on July 29 this year and is free for users of Windows 7, Windows 8, and Windows 8.1.
If you are a new user, you will have to pay for Windows 10 but if you own a licensed copy of Windows 7 or 8, then you can reserve your copy of Windows 10 today, and you can download it on launch day.
Reserving your copy of Windows 10 is simple, just follow these steps to get it done. First though, you need to install the latest Windows updates on your PC.

  1. On Windows 8, you can do this by pressing Windows key+C > Settings > Change PC Settings.
  2. Now click Update and recovery on the left pane. Hit the download or install button to update your PC.
  3. On Windows 7, you can do this by clicking on the Start button, type update in the search box and click Windows Update.
  4. In the left pane, click Check for updates. Now select all updates and click Install updates.
After the updates are installed, the Get Windows 10 app should be installed on your computer. This app lets you reserve your copy of Windows 10. Here's how.
  1. Click the Windows icon on the system tray.
  2. Click Reserve your free upgrade.
  3. Enter your email address to receive confirmation of your reservation.
  4. Now you'll see a message that says your upgrade has been reserved. There's a Cancel reservation button on the bottom left here. You can click that if you wish to cancel your reservation.

If you don't see the Get Windows 10 app even after installing updates, you can visit the MicrosoftFAQ page for help. For more tutorials, visit our How To section.

How to Use Your Xbox One Controller With a PC


The Xbox One controller is a step up from the Xbox 360 controller, refining an already fantastic gamepad. The 360 controller is the de facto standard for many a PC gamer who prefers to play games without a keyboard and mouse, and thanks to rubberised analogue sticks that give it much needed grip, and a directional pad that's actually usable in fighting games, the Xbox One controller is well worth the price of entry.
While Microsoft is taking its own sweet time in making it usable on the PC without wires, you can easily game on your computer with an Xbox One controller that's wired in.
In addition to a computer with Windows, all you need is a Micro-USB cable (used for charging most Windows and Android smartphones), an Internet connection to download the required drivers, and, of course, an Xbox One controller.
  1. Install drivers
    Boot up your PC, connect to the Internet. Download and install one of these driver packages depending on your version of Windows:

  2. PC drivers for 32-bit Windows
    PC drivers for 64-bit Windows
  3. Connect the controller
    With the drivers installed, plug in the Micro-USB end of the cable to the controller and the USB end of it into your computer's USB port. If it works, the controller will vibrate. If it does not vibrate, try another Micro-USB cable and/ or a different USB port.
That's all you need to do to get your Xbox One controller working on the PC.
Please note:
If you plan on using the same controller with an Xbox One, you will need to re-sync the controller to the console. You can do this by holding the wireless sync buttons on the console and controller at the same time or attaching it to the console via Micro-USB cable.

How to Take Screenshots on the Xbox One and Share Them


Many think of gamers as loners who spend countless hours in the basement playing their favourite titles. Well, that may be true, but when we come across something beautiful - like the perfect goal in FIFA or a photo finish race in Forza Horizon 2 - we like sharing it with our friends as much as the next guy.
Microsoft may not have gotten around to adding screenshot capabilities to the Xbox One when it shipped, but a recent update brought this feature to the shiny gaming console. Here's how you can take a screenshot on the Microsoft Xbox One:
  1. While playing a game double tap the Xbox button on your controller to capture a screenshot and pressing Y to save the screenshot. Or if you're one of the rare few with Kinect plugged into your Xbox One, you can say "Xbox, take a screenshot" to take and save a screenshot.
  2. After saving the screenshot. Press the Xbox button to suspend the game.
  3. Go to the Upload app on your Xbox One and choose the screenshot you want to share from Manage Captures.
  4. Press the Menu button and choose Share.
  5. The screenshot can be uploaded to Twitter, OneDrive, your Xbox activity feed, private message, or your own personal showcase. Choose the service you want to upload it to.
That's about it - taking a screenshot and sharing it from the Xbox One couldn't be simpler, right?
Please note:
  1. The first time you connect to Twitter or OneDrive on the Xbox One, you need to enter your username and password for services.
  2. Though Twitter lets you upload multiple pictures on other devices, on the Xbox One you are limited to uploading only one image at a time.

How to Download and Install Windows 10 Technical Preview for Phones


Windows 10 Technical Preview for phones is now available to download. This is a pre-release version of Microsoft's upcoming mobile operating system. You should only download this if you want to try a new operating system on your Windows Phone device. Since this is beta software, many of your favourite apps may not work on it and upgrading to it right now is not recommended on your primary phone as the preview is still very much a work in progress.
If you have a spare Windows Phone device lying around or if you love playing around with latest (potentially buggy) builds of operating systems, then read on.
Supported devices
Currently, Microsoft says only six Lumia phones can download and install Windows 10 Technical Preview for phones. These are:
  • Lumia 630
  • Lumia 635
  • Lumia 636
  • Lumia 638
  • Lumia 730
  • Lumia 830
More phones will be supported in future builds, but for now only users of the phones listed above can try Windows 10 Technical Preview.
Backing up your data
This is beta software and hence can be very buggy. That's why we recommend that you make a complete backup of your Windows Phone first. We have written a detailed guide on how to backup and delete all data on your Windows Phone device and you must go follow all the steps listed there before proceeding.

Downloading and installing Windows 10 Technical Preview for phones
The process for downloading Windows 10 Technical Preview for phones is not too hard, especially if you know how to download and install Windows 10 Technical Preview on your PC. Follow these steps.
  1. Head to the Windows Insider page.
  2. Click Get Started to sign up for the programme.
  3. Enter your Outlook.com email address and password.
  4. Click Sign in.
  5. Read the terms of service, scroll down and check I accept the terms of this agreement (required).
  6. Click Submit.
  7. Scroll down and click Phone.
  8. Scroll down and click Get the preview.
  9. Download the Windows Insider app on your Windows Phone device.
  10. Open the app and sign in using your Microsoft account.
  11. Tap Get preview builds.
  12. Here you'll have to choose between receiving OS updates as they're released or after some bugs have been fixed. Tap Insider Fast to stay on the bleeding edge or pick Insider Slow if you'd like a slightly more reliable build.
  13. Take a look at all the warnings and then tap Accept.
  14. Tap the Windows button on your phone.
  15. Go to Settings > Phone Update.
  16. Tap Check for updates.
Now you'll be able to download the latest Windows 10 builds for your smartphone. Tell us about your experience with Windows 10 on mobile and PC via the comments. For more tutorials, visit our How To section.

How to Backup and Delete All Data on Your Windows Phone Device


Planning to sell or give away your Windows Phone 8 device to someone? You should make sure that all your personal data has been wiped securely from the device. We've previously covered how to do this on iOS and on Android.
In both those articles, we emphasised on the fact that your data should be encrypted before it is erased. This makes it harder for others to access your data after you've erased it. While both Android and iOS support encryption, Windows Phone 8 does not. This doesn't mean that your data on Windows Phone 8 is completely unprotected, but it just means that someone determined enough might be able to salvage parts of your personal data from your phone.
Before we get to securely wiping your personal data, let's take a look at how to create backups on Windows Phone 8.
How to save data on the cloud
1. If you have an Internet connection, Windows Phone 8 lets you save backups online. For this you'll need a Microsoft account. If you've been using a Windows Phone 8 device, you should have created this during setup or while downloading apps, so this should not be a problem.
2. You will also need a OneDrive account for saving photos and videos. You can go to onedrive.com or just download the app to create this account.
3. To backup your settings, Internet Explorer favourites, and a list of installed apps, head to Settings > Backup > App list + settings > Backup > On. Tap back up now to start the backup immediately.
4. To backup text messages, head to Settings > Backup > Text messages > Text message backup > On.
5. To save your photos and videos, go to Settings > Backup > Photos. Under both sub-heads - Photos and Videos - pick either Good quality or Best quality. Photos will back up good quality on your cellular Internet connection, but best quality photos and all videos need WiFi to upload.

How to save data on your PC
1. If you prefer a local backup, you can copy paste data manually. This method doesn't save text messages or app data or settings.
2. Plug in the phone to your PC. Go to My Computer (Windows key + E) and the device will show up as a removable drive titled Windows Phone. Open it, double-click Phoneand copy pictures, music, ringtones and videos from their respective folders.
How to securely wipe data
If you've locked your phone with a passcode, then it can't be unlocked by anyone who doesn't know the passcode. If someone tries to access your data, they will have to reset the phone to factory settings - which erases all of your personal content. You can also manually wipe all your data by resetting your phone. While this removes all the files it is still possible for someone to restore the deleted files. With just a few simple steps you can prevent this too.
1. Go to Settings > About > Reset your phone. Tap Yes twice to start the process.
2. When the process is complete, connect the phone to your PC and open it via My Computer as described earlier. When you double-click Windows Phone, you'll see an empty drive labelled Phone that will show the amount of free space on the device.
3. Copy large files such as HD movies and fill up the internal storage on your phone. This is similar to copying files to a pen drive.
4. Once you have filled the phone completely, delete those files. Repeat this a few times to offer yourself greater protection against someone recovering deleted data such as photos from your phone.
5. If your phone has a microSD card, repeat steps 3 and 4 with the card. When you double-click Windows Phone as described in step 3, the microSD card will show up as a separate drive labelled SD Card.

How to recover your data
To recover the photos, app settings and other files you backed up to the cloud, you need to do the following:
1. Boot your recently wiped or new Windows Phone device. Sign in with your Microsoft account.
2. Wait for some time while your Microsoft account data synchronises with the device.
3. You'll be prompted to restore your phone and be shown a list of backups available. Select the backup you want and tap Next.
4. Key in the security code, then tap Next.
5. Now just wait for the restoration to complete. Tap Next
6. You'll be asked to enter passwords for your email and social accounts. Tap Skip (you can do it later) and then tap Done.
7. To find your saved photos and videos, just open the OneDrive app and sign in.
Transferring media files from your PC back to the phone is also simple:
1. Connect the phone to your PC via the USB cable.
2. Go to My Computer on your PC and open the Windows Phone drive as described earlier, and copy the various media files you had backed up.
That should securely wipe your data on Windows Phone. Were you able to delete all the data on your Windows Phone 8 device by following these instructions or did we miss anything? Let us know via the comments.
For more tutorials, visit our How To section.

How to Make a Bootable USB Disk for Windows 8, Windows 7, Windows XP


Ever faced a virus attack on your PC? Have an old laptop that refuses to boot up one fine day, throwing up errors such as bootmgr missing or NTLDR missing? Your best option in both these cases may be to reinstall Windows on your computer. When you first use your computer, you're prompted to create a DVD backup of your Windows install, but keeping a DVD safely and not losing it can be a bother. Being able to reinstall Windows using a USB you just keep nearby can be a big help, and to do this all you need to do first is create a bootable Windows USB drive. This is also very helpful if you bought a compact laptop - many smaller new devices don't have a DVD drive.
Remember you'll need a working Windows install (any version) to do this - if your computer won't boot, use a friend's to follow these steps.
Here's everything you need to know about the process.
Windows 7
The first thing you need is a Windows ISO or an image file. This is a virtual copy of a Windows installation DVD and you can source this legally from Microsoft without a product key. Here are the links for various edition of Windows 7.
You'll still need a valid product key when you reinstall Windows so make sure you keep that safely.
Once you've downloaded the Windows 7 ISO file, follow these steps to burn it to a pen drive.
  1. Download the Windows USB/DVD tool from here and run it.
  2. Click Browse and select the downloaded Windows 7 ISO file.
  3. Click Next.
  4. The next page asks whether you want to save this file to a USB or a DVD. ClickUSB device.
  5. Connect a pen drive with at least 4GB space to your computer. Make sure you back up all data on the pen drive to your computer as it will be erased during this process.
  6. Select your pen drive from the drop down menu and click Begin copying.
  7. When this process is complete, you'll have a bootable Windows 7 USB ready.


Windows 8
  1. Download the Windows Installation Media Creation Tool from here and run it.
  2. Select the Language from the first drop-down menu.
  3. Then select the Edition of Windows you want to install. Your choices are: Windows 8.1, Windows 8.1 N, Windows 8.1 Pro, Windows 8.1 Pro N and Windows 8.1 Single Language.
  4. In the third drop-down menu next to Architecture choose whether you want a 32-bit or 64-bit version of the OS. If your computer has less than 3GB RAM, then pick 32-bit. If it has more than 3GB RAM, pick 64-bit. If you need to see which version you're running right now, right click on My Computer and selectProperties. There, you'll see the information you need under Windows Edition and System type respectively.
  5. Click Next.
  6. Plug in a USB drive to your computer. Make sure that it has at least 4GB space. If there's any important data on the drive, create a backup as this process will erase the pen drive completely.
  7. Now you'll be asked to choose where to save the ISO file. Choose USB flash drive.
  8. Click Next.
  9. You'll see a list of USB drives connected to your computer. Select your pen drive from the list and click Next.
  10. Now the Media Creation Tool will begin downloading the ISO straight to your pen drive. When the download completes, click Finish.

Windows XP
  1. Go to the Windows XP SP3 ISO download page.
  2. Select the language from the drop-down menu and click the big red Downloadbutton.
  3. Download a free programme such as ISOtoUSB to burn the image to a pen drive. There are a lot of apps that let you do this and you can use any of these. We found ISOtoUSB easy to use and light, so we picked it over others.
  4. Install ISOtoUSB on your computer and open it.
  5. Click Browse and select the downloaded Windows XP ISO file.
  6. Plug in a pen drive with at least 1GB free space to your computer. All data on this pen drive will be erased so make sure you have a backup.
  7. In ISOtoUSB, select the pen drive from the drop-down menu.
  8. Click the checkbox next to Bootable
  9. Click Burn.
When the process is complete, a bootable Windows XP USB drive will be ready.
Booting and installing Windows
Now you have a bootable pen drive ready, you can boot off this drive and install Windows. Installing Windows is quite straightforward, but the steps leading up to it may vary a little depending on the manufacturer of your computer. We've added a brief explanation below on how to do this.
When you're booting up the computer, on the very first screen, you'll see a text which says something like "Press Del to Enter BIOS". Press whatever key is listed - this is usually Delete, or one of F1, F2, F8, or F12 - when the computer is booting, to enter the BIOS. There, you need to find a menu like Advanced BIOS settings, and select USB as the primary boot device. Now, you need to save and exit BIOS - the key to do so will be listed on-screen, but it is usually F10. Plug in the USB, and when you reboot, you'll start the install process for Windows on your computer. Follow on screen instructions to install Windows 8, Windows 7, or Windows XP.
Did you manage to create a bootable Windows pen drive? Let us know via the comments. For more tutorials, head to our How To section.

How to Remove Preloaded Apps From Your PC


Ever wondered why your brand new PC came pre-loaded with so many apps that you'll never use? If yes, then the simple answer is that it is one of the few ways in which branded PC manufacturers make money. Pre-loading apps is one of the few sources of revenue for them, so they do it even though you, the buyer, will never use most of them.
But why should you remove these apps? After all, some of them might be useful. While that's a popular assumption, most people never use any of the apps that are pre-loaded on their branded computers. These apps occupy a lot of space and some of them start when your computer starts, which slows down the machine. A few of them even throw up annoying advertisement banners which are very hard to disable permanently.
For all these reasons, it's a good idea to just remove all these useless apps, popularly known as bloatware, from your computer. Here's how to identify and remove bloatware from your PC.
  1. If you know which apps you want to remove, then you can easily go to Control Panel > Programs and Features, select programs you don't need and click Uninstall.
  2. But if you don't know whether a certain app is useful or not, you should install an app that tells you whether the programs on your PC are useful.
  3. There are many such apps, but the one we liked the most in called Should I Remove It. You can download it here.
  4. Once you have installed the app, it will show you a list of apps installed on your PC. It displays a rating for each app (based on feedback from those who use Should I Remove It and a "group of power users") and shows the percentage of people who remove the app in a neat horizontal coloured bar.
  5. Apps that have a green bar next to them are safe to keep on your PC, but those marked red can easily be removed.
  6. Should I Remove It makes it easy for you to find out what any installed app does. Just click the name of the app and then click What is it? for an app description.
  7. To remove apps, click the name of the app and then click Uninstall.
This works well for desktop apps, but those who use Windows 8's Modern UI apps can follow these instructions to remove bloatware.
  1. Go to the Start Screen in Windows 8. Just tap the Windows key to get there.
  2. Right click any app you don't need and click Uninstall.
It's easy to remove bloatware from your PC, but did you manage it successfully? Let us know via the comments. For more tutorials, visit our How To section.

How to Remotely Control Your Computer From a Phone or Tablet


Your dad is having an issue with the computer at home but in spite of giving him instructions for an hour, he can't seem to fix the issue. One way to make sure he's actually following the steps you're dictating over the phone would be to use his phone as a webcam to quickly look at the screen, but an even better option would be to just take over his computer from your phone or tablet, and resolve things yourself over the Internet. How do you do that? That's where we step in. Read on:
  1. The first thing that's needed is a little foresight. Download and install TeamViewer on your parents' computer now, and on your smartphone or tablet too. TeamViewer is free for personal use on Windows, Mac, Linux, iOS, Android, Windows Phone and BlackBerry, and you can find the download links for all these platforms on the TeamViewer page.
  2. Make sure both the computer and the phone are connected to the Internet.
  3. Open TeamViewer on the computer.
  4. Note down the ID and password that's displayed in TeamViewer - or have someone tell it to you on phone.
  5. Fire up TeamViewer on the smartphone or tablet.
  6. Enter the ID and password you noted down earlier in the smartphone/ tablet TeamViewer app.
  7. Tap Remote Control.
  8. Now you'll see the computer's screen on your phone or tablet. You can control it easily now.
TeamViewer works across the Internet, and not just when the two machines are connected to the same network, so you can now troubleshoot problems on your parents' computer right from office, or if you've installed the program on your home desktop, you can access your files and send those emails you were supposed to have saved to your laptop. You can tap on the screen to simulate a mouse-click, and if you tap on a text entry field, a virtual keyboard pops up so you can type.
There can be a little delay in what you're doing on the mobile and what's happening on the computer, depending partly on the speed of both Internet connections, so it's not the same as being there, but if you just want to troubleshoot something urgently, or if you need to get some important work finished, TeamViewer can be a lifesaver.
There are many more remote connection apps that let you control your computer via your phone or tablet, but we picked TeamViewer because it is extremely easy to use, as you can see from the steps above. TeamViewer is also free for personal use, so that's an added advantage.
Which method do you use to control your computer from your smartphone? Let us know via the comments. You can always find more tutorials in our How To section

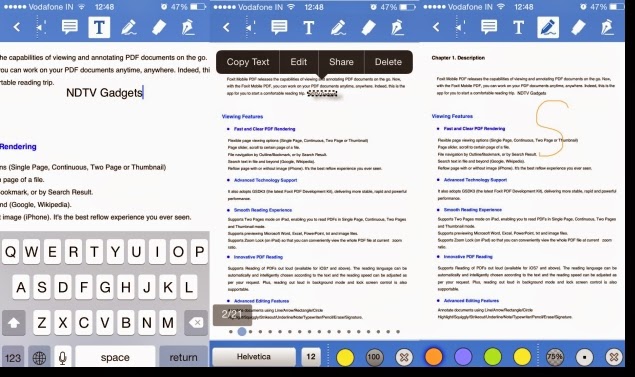
How to Edit PDF Files for Free on (Almost) Any Platform


Ever received a pdf file as an attachment, and wondered how to append your signature without printing it out and scanning the final copy? Or how to fix that one typo before sending it back? Of course you have.
The pdf or Portable Document Format is a popular file format that lets you view documents across platforms without disturbing its formatting. PDF files, which often house comics, novels and various bills, aren't meant to be edited. That's why it is hard to find a one-size-fits-all pdf editing solution for free. But it can be very inconvenient when you need to fill a form or add a line to a document which was sent as a pdf.
While Adobe Acrobat XI (Rs 30,000) and Nitro PDF Editor (Rs 11,000) are good apps, their cost is prohibitive for most people. Luckily, there are free alternatives on most devices now. Read on to find out how to edit pdf files without spending a dime.
On the Web (Works on Android, BlackBerry 10)
If you don't have a Windows or a Mac machine, or if you don't want to install any applications, head to PDF Buddy for basic editing tools. This website also works for editing pdf files on an Android phone, but not on iOS devices. In case you want to try the website first, PDF Buddy lets you use basic features (adding shapes, symbols, text, whiteout and highlight) without creating an account. You will have to create an account if you want to do anything useful like save or download the edited file, add images or signatures to the pdf file. You can edit up to three pdf files a month for free. The website asks you to pay $8 (roughly Rs 500) per month to let you edit an unlimited number of files.
Ease of use is PDF Buddy's strength, but it may not be the best tool for power users. Text editing options are limited to two fonts and you'll have to manually place text so that it aligns with the rest of the line. However, this may not be a limitation for those who just want to fill out forms without printing the document. PDF Buddy also lets you merge, split and share pdf files. Here is how to use it:
1. Drag a pdf file into the browser or click the Choose PDF to Edit button on the website and then select the file you want to edit.
2. Now, PDF Buddy will open the file (might take long for large files). Once it opens, you'll see a set of editing tools on the left side of the file.
3. The editing tools are fairly straightforward, since the name of each tool tells you what it does. You can choose the text tool to edit text and whiteout tool to erase text. Note that only two fonts are supported (Arial and Times). You can also highlight text, add images and signatures, using the corresponding tools.
4. Below the tools mentioned above, PDF Buddy has shapes and symbols, which you can add to your file. You can use symbols such as "thumbs up", "thumbs down" and "arrows" as bullet points or for annotations if needed.
5. Above the pdf file, you'll see arrows pointing to the right and left. Use these to move to the next or previous page.
6. When you finish editing, hit the Save button at the top of the page. This will save a copy of the file on the website. If you want to save it on your computer, click the Download button that's next to the Save button.


For desktops and laptops
For those who use Windows, Mac or Linux, LibreOffice Draw may be the best programme for editing text in pdf files. LibreOffice is a full office suite and you'll have to download the setup file for the whole suite to use Draw. Fortunately, during installation the programme lets you select the software you want to install. This means that you can install Draw without installing all the other apps in the office suite. Like PDF Buddy, Draw is easy to use. Follow these steps and you should be able to edit pdf files easily. Note that these steps are for the Windows version of Draw, but the process is similar for Mac and Linux.
1. LibreOffice Draw can open pdf files without any configuration. All you have to do is press Ctrl+O or click File > Open, and select your pdf file.
2. All the tools are laid out at the bottom and should be familiar to anyone who has used MS Word. Click on the line you need to start editing and get to work.
3. Before you get to editing, note that LibreOffice Draw can make formatting go haywire. We imported a pdf file with bullet points, symbols and underlines. Draw moved all of these and it took us a lot of time to restore these to their original positions.
4. To align various elements, just click and drag to move them.
5. As long as your system has the font used in the pdf file, text editing is fairly easy. All you need to do is select the text you want to edit and start typing. Each line of text, bullet point, underline, etc. appear as an object in Draw.
6. When you finish editing, select the Export as PDF option in the File menu.

Using a word processing app
Another way to edit pdf files is to convert them to a more edit-friendly file format. Websites such as PDFtoword or PDFonline. PDFtoword also lets you convert pdf files to Excel and Powerpoint formats. This lets you edit the document in an app like MS Word, and then save it again as a pdf.
1. Head to PDFonline and click on Upload a File to Convert. Select your file and upload it - this can take some time for large files.
2. When uploading is complete, the website will show you the document, along with a Download button at the top. Click this button and select Download Word file. This will save the document as an rtf file, which can be opened by most text editors including Microsoft Word. Open it and make the changes you wanted to. In case you see a yellow band with the words "Protected View", then you will need to click on Enable Editing first.
3. When you are done editing, you can save the document as a pdf file. In Microsoft Word, click File > Save as and select PDF as the file type from the "Save as type" drop down menu under the filename. LibreOffice has a Export as PDF option in the File menu.
This method works best when the data on the pdf file is in a format that suits the format you choose to convert it to. For example, you are bound to face formatting issues if you try to convert a heavy pdf file with several images to Word format.
While the Web-based method works best, if you want to convert files without an Internet connection, you will have to download the PDF to Word converter software for Windows.

iPhone and iPad
Unfortunately, there are no good, free pdf editing tools for you. The closest thing to a free pdf editor on iOS is Foxit Mobile. It's free to download and you can try all its tools on a couple of sample pdf files that come with it. The catch is that the app asks you to pay Rs 60 each for Dropbox, SkyDrive or Google Drive support. You can edit as many pdf files in the selected cloud account after that. If you want to create a new pdf from photos and text on your iOS device, you'll have to shell out Rs 60 more as a one-time purchase. Here's how to use Foxit on your iOS device.
1. Open your pdf file and select the pencil tool at the top. Now, all editing tools will appear at the top.
2. Select the tool you need (text, drawing, eraser or comment) and start editing.
3. When you finish editing, hit the back button at the top-left. Then select the export button (a box with an arrow pointing out of it) on the top-right to save or share the edited file.

Did you find this guide useful? Which is your favourite software to edit pdf files? Drop a comment to let us know

How to Download and Install Windows 10 Technical Preview


Microsoft unveiled the next version of Windows on September 30, choosing to skip a version number and hop from 8 to 10. While the final version of Windows 10 is expected to be released in 2015, the Technical Preview release - targeted at PC experts who understand the risks involved in downloading unfinished software - will be available starting October 1.
Understanding Windows 10 Technical Preview
In this preview, Windows 10 will go through a lot of change with updates, and you will have access to the Windows Feedback app. This app helps send feedback to Microsoft about the different features they are adding and removing to Windows 10 in the preview period and thus, helps you be a part of the team that improves and polishes the OS.
That apart, there are many new features that you can try out with Windows 10. For one thing, it has a new start menu - a blend of live tiles and classic desktop apps. The Windows apps also don't have to run in a forced full-screen mode, making them more useful for desktop users. Windows 10 also features much improved file explorer and search features.
(Also see: Ten Things We Know About Windows 10)
Windows also finally supports multiple desktops now. If these are features you had been crying out for since switching to Windows 8, then the Windows 10 Technical Preview will be quite appealing.
Warning
Before you proceed to try this release, know that you might face system-breaking bugs and end up losing data. If you're installing Windows 10 on your primary PC, we suggest you take a complete backup. Microsoft recommends that you install it on a secondary PC, which is sound advice when using unfinished software.
How to download Windows 10 Technical Preview
If you still want to go ahead, then here's how you can download the Windows 10 Technical Preview.
1. Join the Windows Insider Program using this page.
2. Make sure you have a machine that meets the Windows 10 minimum system requirements:
  • Processor: 1 gigahertz (GHz) or faster
  • RAM: 1 gigabyte (GB) (32-bit) or 2 GB (64-bit)
  • Free hard disk space: 16 GB
  • Graphics card: Microsoft DirectX 9 graphics device with WDDM driver
  • A Microsoft account and Internet access
Microsoft also notes that you won't be able to play DVDs using Windows Media Player after installing the preview. It says that some processors and hardware configurations might be blocked from installing the preview, without naming any specific models. Currently, only three languages are supported in the preview - English, Simplified Chinese and Brazilian Portuguese.
3. Download the Windows 10 Technical Preview install files directly from these links:
4. After downloading one of these files, you can use an app like ImgBurn to burn the Windows 10 image file to a DVD or a USB pen drive.
5. Double click (or double tap if you are on a touch device) setup.exe and follow the on-screen instructions.
If prompted for the Windows 10 Technical Preview product key, use NKJFK-GPHP7-G8C3J-P6JXR-HQRJR
User data and rollback
If you are installing the preview on top of Windows 7 or 8 and above, you should be able to preserve Windows settings, personal files, and most apps when upgrading to Windows 10 Technical Preview. However, Windows Vista users will have to do a clean install, and since the Windows 10 Technical Preview is x86 only, Windows RT users are completely out of luck.
If, after installing Windows 10 Technical Preview, you want to go back to your old version of Windows for whatever reason, you need to be prepared before you install the preview. Windows 7 or Vista users should create recovery media from a recovery partition on your PC using software provided by your PC manufacturer. Windows 8 or above users should create a USB recovery drive.
Check the Microsoft website for more information before proceeding with the installation of Windows 10 Technical Preview.
Updates and other information
Once you've installed the preview, you'll get automatic updates. Your preview copy will expire on April 15, 2015, by when we should have a consumer preview of Windows 10. Microsoft has posted instructions to help you familiarise with the new Windows 10 operating system.
The Windows Insider Program allows users to stay on the cutting edge of Windows software. Microsoft will issue frequent updates that you can download as and when available.
A consumer preview version of Windows 10 will be available early next year, and that is probably a much better option for most users. If you can't wait though, you can download this early release build of Windows 10.
For more tutorials, visit our How to section.

Ten Things We Know About Windows 10


After months of speculation and plenty of leaks, Microsoft has given the world its first official look at the next version of Windows. The biggest surprise is its name - Windows 10. While some of the new features are predictable, others come as surprises. It's clear that Microsoft has gone back to the drawing board after enduring endless criticism of its bold Windows 8 strategy and redesign. The reinvented Windows tries to combine the best of both worlds.

1. Windows 10 will be designed to appeal to office workers
After years of dealing with complaints that Windows 8 was too different to roll out in large-scale corporate environments and would require massive resources to be spent on retraining users, Microsoft has decided to appeal to that crowd by incorporating familiar elements and hiding features that won't be applicable. The new Start menu is a prime example of this.

2. ...and corporate IT managers
On the management side, Windows 10 promises better security, easier manageability, and improved capabilities for dealing with today's security threats. There will also be improved methods of installing and dealing with volume licenses, making the upgrade process easier. Custom app stores will help corporate environments to deal with software deployments and permissions. There is still a huge install base of Windows XP machines in office environments which work just fine, but Microsoft's new features might be tempting enough for managers to finally decide that an upgrade is worthwhile.


3. Windows 10 will scale from small smartphones to giant data centres
The Windows 10 name will apply to future versions of Windows Phone as well as Windows on tablets, desktop PCs and hybrid portable devices. The same experience will carry over to the Xbox One console and potentially other devices as well. Users will see an interface suited to their device type, screen size and input methods, so for example, the full-screen Start UI will not necessarily be a part of the desktop usage experience, but will appear for touch-first tablet users. There will even be a way for users to switch between the two modes, especially if they use tablets with detachable or foldable keyboards.

4. The new Start menu will combine Windows 7's usability with Windows 8's tiles
While a lot might change between now and the final release of Windows 10, previews indicate a two-column Start menu with old-style icons for pinned or recent programs on the left, and live tiles on the right displaying updates and information. The tiles will be customisable, though at their smallest size they will be functionally identical to pinned shortcuts.


 5. Modern apps will run in windows on the desktop
Desktop users will be able to run Modern apps (downloaded from the Windows store) on the desktop just like other apps. They will be resizable and can be pinned to the taskbar. Important functions will be accessible through a context menu.

6. Virtual Desktops are finally coming to Windows
A mainstay of OS X and most Linux distributions for years, virtual desktops have remained a niche feature on Windows. In another move aimed at appeasing hardcore desktop users, virtual desktops are now baked right in. A new Task View will let you see an overview of all running apps and arrange them between desktops.

7. Snap has also been improved

You can now quickly tile four apps at once on the Windows 10 desktop just by dragging them to the corners of your screen. You'll see suggestions for filling up your screen so that you don't have to deal with overlapping windows. Desktop users with large monitors will rejoice.


8. Search and power user features will be improved
The new search feature combines local and Web results. You can begin searching just by typing when the Start menu is open, which means you can continue to hit the Start button and just start typing exactly like in Windows 8. Microsoft has another treat for power users - finally, you can use a simple Ctrl+V shortcut to paste text into the Command Prompt.

9. The Charms bar isn't going anywhere

Just like with the Start screen, Microsoft isn't completely removing all vestiges of Windows 8. The Charms bar remains, though most probably only visible to users of touch-first devices. It will be improved, and those Windows 8 users who are familiar with it can continue to use it.

10. There's much more to come
Microsoft has teased that there are plenty of good reasons for its decision to skip a Windows 9 and jump two version numbers ahead. We hope to see many more improvements and refinements of the concepts that have been demonstrated so far. With public beta releases not too far away, it's going to be an eventful year leading up to the final release of Windows 10.

How to Backup and Delete All Data on Your Windows Phone Device


Planning to sell or give away your Windows Phone 8 device to someone? You should make sure that all your personal data has been wiped securely from the device. We've previously covered how to do this on iOS and on Android.
In both those articles, we emphasised on the fact that your data should be encrypted before it is erased. This makes it harder for others to access your data after you've erased it. While both Android and iOS support encryption, Windows Phone 8 does not. This doesn't mean that your data on Windows Phone 8 is completely unprotected, but it just means that someone determined enough might be able to salvage parts of your personal data from your phone.
Before we get to securely wiping your personal data, let's take a look at how to create backups on Windows Phone 8.
How to save data on the cloud
1. If you have an Internet connection, Windows Phone 8 lets you save backups online. For this you'll need a Microsoft account. If you've been using a Windows Phone 8 device, you should have created this during setup or while downloading apps, so this should not be a problem.
2. You will also need a OneDrive account for saving photos and videos. You can go to onedrive.com or just download the app to create this account.
3. To backup your settings, Internet Explorer favourites, and a list of installed apps, head to Settings > Backup > App list + settings > Backup > On. Tap back up now to start the backup immediately.
4. To backup text messages, head to Settings > Backup > Text messages > Text message backup > On.
5. To save your photos and videos, go to Settings > Backup > Photos. Under both sub-heads - Photos and Videos - pick either Good quality or Best quality. Photos will back up good quality on your cellular Internet connection, but best quality photos and all videos need WiFi to upload.

How to save data on your PC
1. If you prefer a local backup, you can copy paste data manually. This method doesn't save text messages or app data or settings.
2. Plug in the phone to your PC. Go to My Computer (Windows key + E) and the device will show up as a removable drive titled Windows Phone. Open it, double-click Phone and copy pictures, music, ringtones and videos from their respective folders.
How to securely wipe data
If you've locked your phone with a passcode, then it can't be unlocked by anyone who doesn't know the passcode. If someone tries to access your data, they will have to reset the phone to factory settings - which erases all of your personal content. You can also manually wipe all your data by resetting your phone. While this removes all the files it is still possible for someone to restore the deleted files. With just a few simple steps you can prevent this too.
1. Go to Settings > About > Reset your phone. Tap Yes twice to start the process.
2. When the process is complete, connect the phone to your PC and open it via My Computer as described earlier. When you double-click Windows Phone, you'll see an empty drive labelled Phone that will show the amount of free space on the device.
3. Copy large files such as HD movies and fill up the internal storage on your phone. This is similar to copying files to a pen drive.
4. Once you have filled the phone completely, delete those files. Repeat this a few times to offer yourself greater protection against someone recovering deleted data such as photos from your phone.
5. If your phone has a microSD card, repeat steps 3 and 4 with the card. When you double-click Windows Phone as described in step 3, the microSD card will show up as a separate drive labelled SD Card.

How to recover your data
To recover the photos, app settings and other files you backed up to the cloud, you need to do the following:
1. Boot your recently wiped or new Windows Phone device. Sign in with your Microsoft account.
2. Wait for some time while your Microsoft account data synchronises with the device.
3. You'll be prompted to restore your phone and be shown a list of backups available. Select the backup you want and tap Next.
4. Key in the security code, then tap Next.
5. Now just wait for the restoration to complete. Tap Next.
6. You'll be asked to enter passwords for your email and social accounts. Tap Skip (you can do it later) and then tap Done.
7. To find your saved photos and videos, just open the OneDrive app and sign in.
Transferring media files from your PC back to the phone is also simple:
1. Connect the phone to your PC via the USB cable.
2. Go to My Computer on your PC and open the Windows Phone drive as described earlier, and copy the various media files you had backed up.
That should securely wipe your data on Windows Phone. Were you able to delete all the data on your Windows Phone 8 device by following these instructions or did we miss anything? Let us know via the comments.
For more tutorials, visit our How To section.

How to Find Your Lost Phone


Ever felt that sinking feeling in the pit of your stomach when you realise that you can't find your phone?
You got yourself a brand new smartphone and took it with you on your daily commute. Somewhere along the way, the phone goes missing. Everyone knows someone who has been in this situation. It can be very tough to deal with that because we rely on our phones for so many things. It could happen to anyone, at anytime, but if it does, you're just stuck worrying: "how can I find my phone?"
But if you've been following our guides, you would have already made a backup of your contacts so you're prepared for the worst case scenario - that the phone is gone for good.
But before you start shopping for your next handset, there are a few things you can still try. All major smartphone platforms offer an easy, built-in method to track your device when it's not with you, and they are extremely effective too.
iPhone
Apple's Find My iPhone service can track a phone's physical location, and more. But it needs to be switched on - hopefully, if you've already lost your phone, then Find My iPhone was already on, but if you still have the phone with you, the first thing you want to do is turn this setting on.
  1. On your iOS device, go to Settings > iCloud > Find My iPhone.
  2. Make sure that the switch next to Find My iPhone is in the green on position.
You can now track your iOS device using an app on another iPhone or iPad, or using the browser. This is how the app works:
  1. Download the Find My iPhone app on your iOS device.
  2. Sign in with your iCloud account - the same one you're using on the iPhone you're trying to find.
  3. Now all the devices that are signed in to that iCloud account will be listed in the app.
  4. Tap any device to see its location.
In case you've misplaced the iPhone, then this should help you track it down, but you will see some more options at the bottom of the screen which you can use.
You will see three buttons at the bottom - Play Sound, Lost Mode and Erase iPhone - or iPad, as the case may be.
  1. Play Sound will play a loud alarm tone that will help you find your iOS device if it is nearby.
  2. Tapping Lost Mode opens up a page where you need to set a 4-digit passcode to lock your iOS device if it doesn't have one already. If it already has a passcode, then you can use this button to lock the phone remotely, so other people can't use it.
  3. In Lost Mode, you can also enter a phone number and a message that will be displayed on the lockscreen. You can enter messages like, "Hello, please return my iPhone. Contact me now". You can also track your device this way.
  4. The Erase iPhone (or Erase iPad) button deletes all the data on the the iOS device, in case you're worried about sensitive data falling into the wrong hands. However, you won't be able to use Find my iPhone to physically track the phone after you erase it.
The features mentioned above are accessible via the Web too. Just head to iCloud and sign in with your Apple ID. The steps and buttons are the same otherwise.

Android
The Android Device Manager works similarly to Find My iPhone. You can either use the device manager on the Internet, or download the app, to use from another Android device. The tracking is on by default. This is how you use it:
  1. Sign in with your Google Account - the same one as the missing phone.
  2. Now you'll see your Android device on the top left.
  3. If it isn't the one you're looking for, click the tiny down arrow next to the device name and select the correct device from the list.
This shows you the location of your missing device, but again, there are three options you can chose from: Ring, Lock and Erase.
  1. Clicking Ring will make your device ring - useful for finding the phone if it is nearby - just missing in your home or office, for example.
  2. Click Lock if you've lost your phone.
  3. In the pop-up, enter a new password, and click on Confirm. You can also enter a recovery message and your phone number. These will be displayed on the lost device.
  4. Click Lock when you're done to lock the device remotely.
  5. To locate the device, click the GPS icon on the top-right of the box, next to the pencil icon. You need to have location access enabled on your Android device for this feature to work. The device can now only be unlocked using the password you just set.
  6. The Erase button performs a factory reset on your device, which is important if you believe you can't recover the phone. But once you do this, then much like Find My iPhone, the Android Device Manager will also not work.
If you have an Android device, you can also track your lost device using the Android Device Manager app - after you log in with the same Google account as the missing device, the steps are the same.

BlackBerry 10
The BlackBerry Protect service also has these same features, but you'll need to turn BlackBerry Protect and its tracking service on first. If you haven't lost your phone yet, make sure these settings are on.
  1. Go to Settings > BlackBerry Protect.
  2. Flip the BlackBerry Protect switch to On.
  3. Tap Location Services.
  4. Flip the Location Services switch to On.
  5. Tap Back to save changes.
To find your missing phone, just follow these steps:
  1. Click View Location.
  2. If the service can find your phone, its location will appear on a map.
As with the other
  1. You can click the Play Sound button to make your phone ring loudly. This will help you find it when you've forgotten the phone behind the couch cushions.
  2. Display a Message lets you show a custom message on your homescreen even if the device is locked
  3. Lock Device lets you set a new password, and locks the phone.
  4. Wipe Device performs a factory reset, but once you do this, you can't track the phone again.
Windows Phone
Windows Phone users also need to make sure that the Find My Phone setting is enabled on their devices, so the first thing to do is turn that on now, when you still have your phone.
  1. On your phone go to Settings > Find My Phone.
  2. Check Use push notifications... and Save my phone's location periodically and before the battery runs out to make it easier to find.
  3. Go to Settings > Location and flip the switch to On.
Now, you can use the browser on your computer or another device to find your phone if you misplace it or lose it in any other way. This is what you need to do:
  1. Head to the Windows Phone website and sign in with your Microsoft account.
  2. Your Windows Phone device will show up at the top.
  3. Click Find My Phone to locate your device.
  4. If you haven't checked Use push notifications... mentioned in step 2, Microsoft will ask you to set up SMS based alerts. If you are in India, you need to scroll down all the way and select "Bharat" written in Devnagri script.
  5. If you are setting up SMS alerts, enter your phone number, click the check box below and click Done.
  6. Clicking Find My Phone (above the map) will locate the device on the map.
After you've found your phone on the map, you can carry out certain functions, as with the other platforms.
  1. Ring makes the phone ring, so you can locate it if it is nearby.
  2. Lock asks you for a new password, and locks the phone, so other people can't use it.
  3. Erase deletes all data on the phone, but you can't track it after this.

Were you able to find your lost phone? Do you think these phone features are useful? Let us know via the comments. For more tutorials, head to our How To section.