Showing posts with label Windows. Show all posts

How to hack windows password without knowing the older password


It is possible to change Administrator password both in Win XP and Vista without knowing it. If you somehow manage to login as an Administrator then you can change the password without knowing it.

Here’s the Step-By-Step instructions

1. Right-click on the “My Computer” icon on the desktop OR in the Start Menu.

2. Select the option “Manage”.

3. On the left pane expand the “Computer Management (Local) tree (if it is not already expanded)

4. Double click “Local Users and Groups” option From “System Tools” tree.

5. Click the “Users” option.

6. Now you will see the list of users on the right side pane, such as Administrator, Guest etc.

7. Right click the “Administrator” and select the option “Set Password” option.

8. Now you will see a warning message, Click on proceed.

9. Now the system asks you for “New Password” and “Confirm Password” .

10. After entering the password click on “OK”. The password is changed. That’s It!..


Who R Using Windows 8 ??


Who R Using Win 8 ??
Some Keyboard Shortcuts 4 them...
Windows key – brings up the Metro start screen. You can start typing to search for an app, just like the Win7 start menu.
Win + D – brings up the old Windows desktop.
Win + C – brings up the Charms menu, where you can search, share, and change settings.
Win + I – opens the Settings panel, where you can change settings for the current app, change volume, wireless networks, shut down, or adjust the brightness.
Win + Z – opens the App Bar for the current Metro application.
Win + H – opens the Metro Share panel.
Win + Q – brings up the Metro App Search screen.
Win + W – brings up the Metro Settings search screen.
Win + F – brings up the Metro File search screen.
Win + K – opens the Devices panel (for connecting to a projector or some other device)
Win + , (comma) – Aero Peek at the desktop.
Win + . (period) – Snaps the current Metro application to one side of the screen. (Right side)
Win + Shift + . (period) – Snaps the current Metro application to the other side of the screen. (Left side)
Win + J – switches focus between snapped Metro applications.
Win + Page Up / Down – moves the current app to the other monitor.
Win + Tab – opens the Metro application switcher menu, switches between applications.
You might notice that we didn’t show screenshots of how all these shortcut keys work, and there’s a reason for that: you need to test them out for yourself to really learn how they work.
Win+X – lunch kind of start menu, very useful
Windows Key + Print Screen saves a screenshot into your Pictures folder. It’s quite handy.
If there’s any other shortcut keys that are new to Windows 8 and we haven’t featured them, be sure to let us know


Make ur Windows Genuine using notepad!!!


Make ur Windows Genuine using notepad!!!!
1. Copy and Paste the following code in the Notepad.
Windows Registry Editor Version 5.00
[HKEY_LOCAL_MACHINE\SOFTWARE\Mi crosoft\WindowsNT\CurrentVersion\WPAEvents]
"OOBETimer"=hex:ff,d5,71,d6,8b,6a,8d,6f,d5,33, 93,f d
"LastWPAEventLogged"=hex:d5,07,05,00,06,00,07, 00,0 f,00,38,00,24,00,fd,02
[HKEY_LOCAL_MACHINE\SOFTWARE\Mi crosoft\WindowsNT\CurrentVersion]
"CurrentBuild"="1.511.1 () (Obsolete data - do not use)"
"InstallDate"=dword:427cdd 95
"ProductId"="69831-640-1780577-45389"
"DigitalProductId"=hex:a4,00,00,00,03,00,00,00 ,36, 39,38,33,31,2d,36,34,30,2d,\
31,37,38,30,35,37,37,2d,34,35,33,38,39,00,5a,00,00 ,00,41,32,32,2d,30,30,30,\
30,31,00,00,00,00,00,00,00,00,0d,04,89,b2,15,1b,c4 ,ee,62,4f,e6,64,6f,01,00,\
00,00,00,00,27,ed,85,43,a2,20,01,00,00,00,00,00,00 ,00,00,00,00,00,00,00,00,\
00,00,00,00,00,00,00,00,00,00,00,31,34,35,30,34,00 ,00,00,00,00,00,00,ce,0e,\
00,00,12,42,15,a0,00,08,00,00,87,01,00,00,00,00,00 ,00,00,00,00,00,00,00,00,\
00,00,00,00,00,00,00,00,00,00,00,00,00,00,00,00,00 ,94,a2,b3,ac
"LicenseInfo"=hex:9e,bf,09,d0,3a,76,a5,27,bb,f 2,da ,88,58,ce,58,e9,05,6b,0b,82,\
c3,74,ab,42,0d,fb,ee,c3,ea,57,d0,9d,67,a5,3d,6e,42 ,0d,60,c0,1a,70,24,46,16,\
0a,0a,ce,0d,b8,27,4a,46,53,f3,17
2. Save the file with the .reg extension.
3. If you run the file means it will ask you the confirmation to add the value to your Registry.
4. Press Yes.
5. Reboot your System.
6. Start Downloading from Microsoft Site


How to avoid installing bundleware with the help of Unchecky


Installing third-party programs isn’t the minefield it was during the good ol’ days of Windows XP. But every now and then, some desktop apps still try to sneak annoying toolbars and other software past you during installation.
Known as bundleware, the options to not install these additional programs can be easy to miss if you’re not paying attention. That’s where a utility called Unchecky can come in handy, by watching over third-party installations so that you don’t have to. It should work with most software and is well worth using when it does.

Checking in with Unchecky

Visit the Unchecky website and click the big, orange Download button on the front page. Install the program as you normally would—it should be a quick process.

Unchecking

No bundleware accepted. Thanks, Unchecky.
Unchecky works in the background, monitoring the desktop programs you install. If a program tries to sneak in some extra bundleware, Unchecky will deselect the option for you.
Watch out! You’re about to install bundleware.
If you attempt to install a program that doesn’t use a standard Windows installer, such as WinZip and some programs from Download.com, Unchecky will warn you if you’re about to install extra programs. That way, you have the option of declining the offer before it sneaks past you.
Unchecky gives you a running total of bundleware denials.
Unchecky also keeps a running total of all the bundleware you’ve avoided. To see this tally in Windows 8.1, click Start and select Unchecky from the ‘All apps’ screen.
That’s pretty much all there is to Unchecky.
If you ever feel Unchecky isn’t doing its job and want to uninstall the program, open the Control Panel and select Programs and Features in the large or small icons view. Windows 8.1 users can get there more quickly by right-clicking the Start button and choosing Programs and Features.
You can select Unchecky from the list of programs installed on your PC and click the Uninstall button toward the top of the window. 
It’s a bundleware jungle out there for Windows desktop users, but with Unchecky, sneaky desktop installs get just a little bit easier to avoid.

How to maximize storage space on your Windows tablet


One of the unfortunate hallmarks of affordable Windows-based tablets is limited storage space. It is not uncommon for low-priced tablets to come with only 32GB or 64GB drives.
A large chunk of that space is taken up by the Windows operating system and any preinstalled applications. Luckily, there are plenty of things you can do to rid Windows tablets of unneeded data to stretch that storage space as far as possible.

Delete Temp File and Prefetch Data

Windows accumulates temporary and cache files like it's in an episode of Hoarders, filling your limited storage with old items you probably don't need. Performing a disk cleanup will delete a good chunk of the junk data stored in the Windows temp folder. To get rid of it all though, you’ll have to delete it manually.

Restart your tablet, and when Windows has fully loaded, close or exit from any applications that placed an icon in your system tray (usually by right-clicking on its icon and choosing close or exit) to ensure they’re not using any temporary files.
Next, click on the Libraries shortcut in your Taskbar, select This PC from the left column in the resulting window, and then double-click on your C: drive. Double-click on the Windows folder and delete all of the files in the Prefetch and Temp folders (C:\Windows\Prefetch and C:\Windows\Temp). As long as you have restarted and don’t have any applications running, deleting the contents of these folders should have no ill effects.
Finally, go back to the root of the C: drive and navigate to the C:\Users\[Your User Name]\AppData\Local\Temp\ folder and delete everything in there as well.
If you haven’t taken the time to purge old prefetch and temp data from your system, you may be surprised by how much space it was taking up.

Purge Your Download Folder

Download folders are often the junk drawers of computers. They are often chock full of installers that will never be used again. Navigate to your Downloads folder (My Documents > Downloads) and delete any files you don’t absolutely need.
Make sure to empty the Recycle Bin too: The files in the Recycle Bin aren't actually deleted until you empty it.

Shrink Your Paging File


Shrinking your paging file is a quick and easy way to free up some storage space.
By default, Windows creates a paging file (also known as a swap file or page file) on the drive that it is installed on, which acts somewhat like additional RAM. It stores bits of data for applications that are running in the background. The paging file dynamically changes size based on how large a file Windows thinks it may need.
Many users like to disable their paging files altogether to regain all of the space used by the files. Not having a paging file can cause problems with some applications though, so instead of disabling it completely, you can simply shrink it.
Go to the Start screen, swipe from the right of the screen (or click Search on the bottom-right of the screen) to open the search panel and type Advanced in the text box. In the search results, click View advanced system settings.
In the resulting window, click on the Settings button in the Performance section at the top. Click the Advanced tab in the Performance Options window that opens, and click Change in the “Virtual Memory” section at the bottom.
When the Virtual Memory window opens, note the current size of your paging file in the line at the bottom labeled 'Currently allocated.' Whatever the number is, cut it in half. Tick the radio button labeled 'Custom size,' and enter that number into the 'Maximum size' field. Enter 16MB for the initial size. Then, click on the Set button, and click OK in all of the other windows that remained open.
You may be prompted to restart the system when you’re done.

Put It In The Cloud

Many cloud-based storage providers offer up multiple gigabytes of free storage space just by signing up for an account. Microsoft’s own OneDrive service (formerly known as SkyDrive) is already integrated into Window 8.1. If you’ve got non-critical personal files taking up storage space on your tablet, move them to the cloud and reclaim that space. It is also recommended that you back up that data to a thumb drive or other backup solution.

Perform a Disk Clean-up


By performing a Disk Cleanup and purging old restore points and other system files, we were able to free up about 3GB of space on a relatively new, hardly touched Surface Pro 3.
Running Windows’ built-in Disk Cleanup utility with its default options deletes some of the temporary data, log files, and installers that Windows can build up over time, among many other things. If you dig a bit deeper into its menus, however, you can also purge shadow copies of system files, error dumps, and old system restore points that can consume a ton of space.
Note: Deleting system restore points makes it much harder to fix problems later. While you may reclaim some space by doing away with restore points, you are also effectively doing away with one of the operating system's safety nets.
If you are absolutely positive you don’t need your older restore points, click on the Libraries shortcut in your Taskbar. Select This PC in the left column of the resulting window, right-click on your C: drive and select Properties from the menu. In the resulting window, click on the Disk Cleanup button, and in the window that pops up, click on the button labeled 'Clean up system files.'
The window will close while Windows calculates how much space will be freed up. When it pops back up, click on the More Options tab, and then click on the Clean Up… button in the “System Restore and Shadow Copies” section at the bottom.
Once a confirmation prompt opens, click the Delete button, and then click back to the Disk Cleanup tab. Tick all of the boxes in the list and click OK.

Run CCleaner

If your tablet is running an x86 or x64 architecture version of Windows—not Windows RT—CCleaner is a great utility for routine maintenance.
Note: If you’re not sure which architecture version of Windows you’re using, open the Control Panel and click on System. In the resulting window, look for the label named “System type.” The Windows architecture version—x86, x64 or RT—will displayed to the right.
CCleaner will rid Windows of a ton of junk data from temp folders and various caches, and it’ll do the same for many popular browsers and applications as well.
Download and install CCleaner and launch the application. On the Cleaner menu, you’ll see tabs for Windows and Applications. Read all of the items that CCleaner will purge from the operating system and various applications. Tick each checkbox for each item you want removed (I typically tick everything except the "Wipe Free Space" option).  If you're unsure, click Analyze and CCleaner will do its best to guess for you. Hit Run Cleaner when you're ready.
If your system is fairly polluted, it may take a while for CCleaner to finish.

Use That micro-SD Card Slot

Many Windows-based tablets feature micro-SD cards slots that can accommodate cards of up to 128GB in capacity. Use the card to store photos, videos, documents and other files that take up lots of space.

How to Reserve Your Free Windows 10 Upgrade


Microsoft Windows 10 is going to be released on July 29 this year and is free for users of Windows 7, Windows 8, and Windows 8.1.
If you are a new user, you will have to pay for Windows 10 but if you own a licensed copy of Windows 7 or 8, then you can reserve your copy of Windows 10 today, and you can download it on launch day.
Reserving your copy of Windows 10 is simple, just follow these steps to get it done. First though, you need to install the latest Windows updates on your PC.

  1. On Windows 8, you can do this by pressing Windows key+C > Settings > Change PC Settings.
  2. Now click Update and recovery on the left pane. Hit the download or install button to update your PC.
  3. On Windows 7, you can do this by clicking on the Start button, type update in the search box and click Windows Update.
  4. In the left pane, click Check for updates. Now select all updates and click Install updates.
After the updates are installed, the Get Windows 10 app should be installed on your computer. This app lets you reserve your copy of Windows 10. Here's how.
  1. Click the Windows icon on the system tray.
  2. Click Reserve your free upgrade.
  3. Enter your email address to receive confirmation of your reservation.
  4. Now you'll see a message that says your upgrade has been reserved. There's a Cancel reservation button on the bottom left here. You can click that if you wish to cancel your reservation.

If you don't see the Get Windows 10 app even after installing updates, you can visit the MicrosoftFAQ page for help. For more tutorials, visit our How To section.

How to Make a Bootable USB Disk for Windows 8, Windows 7, Windows XP


Ever faced a virus attack on your PC? Have an old laptop that refuses to boot up one fine day, throwing up errors such as bootmgr missing or NTLDR missing? Your best option in both these cases may be to reinstall Windows on your computer. When you first use your computer, you're prompted to create a DVD backup of your Windows install, but keeping a DVD safely and not losing it can be a bother. Being able to reinstall Windows using a USB you just keep nearby can be a big help, and to do this all you need to do first is create a bootable Windows USB drive. This is also very helpful if you bought a compact laptop - many smaller new devices don't have a DVD drive.
Remember you'll need a working Windows install (any version) to do this - if your computer won't boot, use a friend's to follow these steps.
Here's everything you need to know about the process.
Windows 7
The first thing you need is a Windows ISO or an image file. This is a virtual copy of a Windows installation DVD and you can source this legally from Microsoft without a product key. Here are the links for various edition of Windows 7.
You'll still need a valid product key when you reinstall Windows so make sure you keep that safely.
Once you've downloaded the Windows 7 ISO file, follow these steps to burn it to a pen drive.
  1. Download the Windows USB/DVD tool from here and run it.
  2. Click Browse and select the downloaded Windows 7 ISO file.
  3. Click Next.
  4. The next page asks whether you want to save this file to a USB or a DVD. ClickUSB device.
  5. Connect a pen drive with at least 4GB space to your computer. Make sure you back up all data on the pen drive to your computer as it will be erased during this process.
  6. Select your pen drive from the drop down menu and click Begin copying.
  7. When this process is complete, you'll have a bootable Windows 7 USB ready.


Windows 8
  1. Download the Windows Installation Media Creation Tool from here and run it.
  2. Select the Language from the first drop-down menu.
  3. Then select the Edition of Windows you want to install. Your choices are: Windows 8.1, Windows 8.1 N, Windows 8.1 Pro, Windows 8.1 Pro N and Windows 8.1 Single Language.
  4. In the third drop-down menu next to Architecture choose whether you want a 32-bit or 64-bit version of the OS. If your computer has less than 3GB RAM, then pick 32-bit. If it has more than 3GB RAM, pick 64-bit. If you need to see which version you're running right now, right click on My Computer and selectProperties. There, you'll see the information you need under Windows Edition and System type respectively.
  5. Click Next.
  6. Plug in a USB drive to your computer. Make sure that it has at least 4GB space. If there's any important data on the drive, create a backup as this process will erase the pen drive completely.
  7. Now you'll be asked to choose where to save the ISO file. Choose USB flash drive.
  8. Click Next.
  9. You'll see a list of USB drives connected to your computer. Select your pen drive from the list and click Next.
  10. Now the Media Creation Tool will begin downloading the ISO straight to your pen drive. When the download completes, click Finish.

Windows XP
  1. Go to the Windows XP SP3 ISO download page.
  2. Select the language from the drop-down menu and click the big red Downloadbutton.
  3. Download a free programme such as ISOtoUSB to burn the image to a pen drive. There are a lot of apps that let you do this and you can use any of these. We found ISOtoUSB easy to use and light, so we picked it over others.
  4. Install ISOtoUSB on your computer and open it.
  5. Click Browse and select the downloaded Windows XP ISO file.
  6. Plug in a pen drive with at least 1GB free space to your computer. All data on this pen drive will be erased so make sure you have a backup.
  7. In ISOtoUSB, select the pen drive from the drop-down menu.
  8. Click the checkbox next to Bootable
  9. Click Burn.
When the process is complete, a bootable Windows XP USB drive will be ready.
Booting and installing Windows
Now you have a bootable pen drive ready, you can boot off this drive and install Windows. Installing Windows is quite straightforward, but the steps leading up to it may vary a little depending on the manufacturer of your computer. We've added a brief explanation below on how to do this.
When you're booting up the computer, on the very first screen, you'll see a text which says something like "Press Del to Enter BIOS". Press whatever key is listed - this is usually Delete, or one of F1, F2, F8, or F12 - when the computer is booting, to enter the BIOS. There, you need to find a menu like Advanced BIOS settings, and select USB as the primary boot device. Now, you need to save and exit BIOS - the key to do so will be listed on-screen, but it is usually F10. Plug in the USB, and when you reboot, you'll start the install process for Windows on your computer. Follow on screen instructions to install Windows 8, Windows 7, or Windows XP.
Did you manage to create a bootable Windows pen drive? Let us know via the comments. For more tutorials, head to our How To section.

How to Remove Preloaded Apps From Your PC


Ever wondered why your brand new PC came pre-loaded with so many apps that you'll never use? If yes, then the simple answer is that it is one of the few ways in which branded PC manufacturers make money. Pre-loading apps is one of the few sources of revenue for them, so they do it even though you, the buyer, will never use most of them.
But why should you remove these apps? After all, some of them might be useful. While that's a popular assumption, most people never use any of the apps that are pre-loaded on their branded computers. These apps occupy a lot of space and some of them start when your computer starts, which slows down the machine. A few of them even throw up annoying advertisement banners which are very hard to disable permanently.
For all these reasons, it's a good idea to just remove all these useless apps, popularly known as bloatware, from your computer. Here's how to identify and remove bloatware from your PC.
  1. If you know which apps you want to remove, then you can easily go to Control Panel > Programs and Features, select programs you don't need and click Uninstall.
  2. But if you don't know whether a certain app is useful or not, you should install an app that tells you whether the programs on your PC are useful.
  3. There are many such apps, but the one we liked the most in called Should I Remove It. You can download it here.
  4. Once you have installed the app, it will show you a list of apps installed on your PC. It displays a rating for each app (based on feedback from those who use Should I Remove It and a "group of power users") and shows the percentage of people who remove the app in a neat horizontal coloured bar.
  5. Apps that have a green bar next to them are safe to keep on your PC, but those marked red can easily be removed.
  6. Should I Remove It makes it easy for you to find out what any installed app does. Just click the name of the app and then click What is it? for an app description.
  7. To remove apps, click the name of the app and then click Uninstall.
This works well for desktop apps, but those who use Windows 8's Modern UI apps can follow these instructions to remove bloatware.
  1. Go to the Start Screen in Windows 8. Just tap the Windows key to get there.
  2. Right click any app you don't need and click Uninstall.
It's easy to remove bloatware from your PC, but did you manage it successfully? Let us know via the comments. For more tutorials, visit our How To section.

How to Disable Notifications in Google Chrome


Desktop notifications are one of the best features of modern browsers. They show previews of email, football scores or even instant messages, letting you to take a quick glance at updates without leaving the work you're doing. But this can get a little overwhelming, particularly when it includes spam and advertisements. If too many sites have begun to send notifications, or if you need to shut out all the noise, you should disable Google Chrome notifications. Doing so is pretty simple:
  1. Open the Google Chrome Settings page. You can either type chrome://settings in the address bar and hit Enter or click the hamburger icon at the top right > Settings.
  2. Scroll to the bottom and click Show advanced settings.
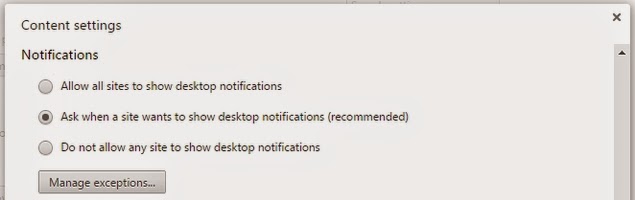
  3. Under Privacy, click Content settings....
  4. Scroll down to Notifications.
  5. Select Do not allow any site to show desktop notifications.
  6. If you want to allow some websites to show notifications, you can click Ask when a site wants to show desktop notifications. Now sites will show notifications only if you permit them to.
  7. Click Manage exceptions... to see the list of sites that you've granted permission for notifications. Click the X to the right of any of these URLs to stop the site from sending notifications.

This method gets rid of desktop notifications from websites. But an app or extension can still send notifications. To disable notifications from individual Chrome apps or extensions, follow these steps.
Windows 7 and 8
  1. Tap Windows key + D or go to the desktop.
  2. Left-click the bell shaped Chrome Notifications icon in the notifications bar in the bottom-right of the screen. If it isn't there, then click the up arrow icon at the start of the notifications bar. Once you see the bell, left-click on it.
  3. Click the gear icon.
  4. Uncheck apps or extensions that you don't want notifications from.

Mac
  1. In the system menu bar, click the bell icon.
  2. Click the gear icon.
  3. Uncheck apps or extensions that you don't want notifications from.
If you want to disable all Chrome notifications, there is an easy way to do so. In case you're working and just want a temporary break, then you can instead right click on the bell-shaped Chrome notifications icon, and click on Do not disturb. This turns off all notifications. You can also click on Do not disturb for one hour or Do not disturb for one day if you just want a short break from notifications.
This next method will permanently stop all notifications, including email and messages. If you need those, then do not do this. If you're certain that you need to get rid of all Chrome notifications, then read on.
Windows 7 or 8
  1. Tap Windows key + D or go to the desktop.
  2. Click the up arrow icon at the start of the notifications bar in the bottom-right of the screen.
  3. Click Customise....
  4. Scroll down to Google Chrome.
  5. In the drop-down menu, select Hide icon and notifications.
  6. Click OK.
Mac
  1. Click Chrome from the top menu bar.
  2. Click Hide notifications Icon from the drop-down menu.


Once you've done this, Chrome will no longer be able to send any notification or alerts at all. Which annoying websites or extensions were spamming notifications on your computer? Let us know via the comments. For more tutorials, visit our How To section.

How to Remotely Control Your Computer From a Phone or Tablet


Your dad is having an issue with the computer at home but in spite of giving him instructions for an hour, he can't seem to fix the issue. One way to make sure he's actually following the steps you're dictating over the phone would be to use his phone as a webcam to quickly look at the screen, but an even better option would be to just take over his computer from your phone or tablet, and resolve things yourself over the Internet. How do you do that? That's where we step in. Read on:
  1. The first thing that's needed is a little foresight. Download and install TeamViewer on your parents' computer now, and on your smartphone or tablet too. TeamViewer is free for personal use on Windows, Mac, Linux, iOS, Android, Windows Phone and BlackBerry, and you can find the download links for all these platforms on the TeamViewer page.
  2. Make sure both the computer and the phone are connected to the Internet.
  3. Open TeamViewer on the computer.
  4. Note down the ID and password that's displayed in TeamViewer - or have someone tell it to you on phone.
  5. Fire up TeamViewer on the smartphone or tablet.
  6. Enter the ID and password you noted down earlier in the smartphone/ tablet TeamViewer app.
  7. Tap Remote Control.
  8. Now you'll see the computer's screen on your phone or tablet. You can control it easily now.
TeamViewer works across the Internet, and not just when the two machines are connected to the same network, so you can now troubleshoot problems on your parents' computer right from office, or if you've installed the program on your home desktop, you can access your files and send those emails you were supposed to have saved to your laptop. You can tap on the screen to simulate a mouse-click, and if you tap on a text entry field, a virtual keyboard pops up so you can type.
There can be a little delay in what you're doing on the mobile and what's happening on the computer, depending partly on the speed of both Internet connections, so it's not the same as being there, but if you just want to troubleshoot something urgently, or if you need to get some important work finished, TeamViewer can be a lifesaver.
There are many more remote connection apps that let you control your computer via your phone or tablet, but we picked TeamViewer because it is extremely easy to use, as you can see from the steps above. TeamViewer is also free for personal use, so that's an added advantage.
Which method do you use to control your computer from your smartphone? Let us know via the comments. You can always find more tutorials in our How To section

How to Access Blocked Websites


While we do not condone piracy on blog, truth is 'blanket bans' often cause legitimate websites to get blocked as well. This is where this little guide will come in handy.
Before trying the methods we've described, make sure that the website has been blocked and is not down. Is It Down Right Now is a fairly reliable website for this. Just open it and enter the name of the website in the form and click Check. It will tell you if the website is down just for you or for everyone.
If the website you want to access is not down but you still can't open it, here are some quick ways to work around the blocks. Note, that one or more of these method(s) may not work for you, if your ISP is not using DNS blocks, for example.


Free Website Monitor

Android App : https://play.google.com/store/apps/details?id=com.freewebsitemonitor


A Simple URL Change
The first thing you want to try is changing the url to https instead of http. Doing this is easy, just follow these two steps.
1) Go to the address bar of your browser.
2) If you want to access "http://blockedwebsite123.com", change it to "https://blockedwebsite123.com" and reload the website. This may not always work, but some users have reported that this has worked on some websites.
Change the DNS
If the URL change doesn't work, then you might want to try changing the domain name server to Google DNS or OpenDNS. Most people have reported that this method works on BSNL for them. Here's how you can do that on any device.
For Windows Vista, 7 or 8 users, here are the instructions.
1) For Windows Vista and 7, click Start > Control Panel > Network and Internet > Network and Sharing Center. If you're using Windows 8, hit Windows key + C > click Search on the right-hand side > type Control Panel in the search bar > select Control Panel > Network and Internet > Network and Sharing Center.
2) Click Change adapter settings, which is on the left sidebar.
3) Right-click the Internet connection (MTNL, Airtel, BSNL, etc.) on which you're having trouble accessing websites, and click Properties.
4) Select Internet Protocol Version 4 (TCP/IP), and then click Properties.
5) Click the radio button next to Use the following DNS Server addresses. If you want to use Google DNS, enter 8.8.8.8 as the Preferred DNS Server and 8.8.4.4 as the Alternate DNS Server. If you want to use OpenDNS, use 202.67.220.220 and 202.67.222.222 respectively. After entering these, click OK.


For Windows XP users, these are the steps.
1) Click Start > Control Panel > Network Connections.
2) Now select your specific Internet connection with access problems, right-click, then select Properties.
3) Left-click Internet Protocol (TCP/IP), and select Properties.
4) Follow the instructions in Step 5 above.
If you are using an iOS device that's connected to a Wi-Fi network, try this.
1) Open Settings > tap Wi-Fi > tap the Wi-Fi network the device is connected to.
2) Tap DNS and change the two values to Google DNS or Open DNS (explained in step 5 above). These two values should be separated with a comma and one space (8.8.8.8, 8.8.4.4).
For Android users, these are the steps.
1) Open Settings > tap Wi-Fi.
2) Long press the Wi-Fi network you're connected to > tap Modify Network.
3) Now tap the box next to Show advanced options. Scroll down.
4) Tap DHCP > select Static IP > scroll down and modify DNS 1 and DNS 2 (as explained in step 5 above).
On BlackBerry 10 devices, try this.
1) Settings > Network and Connections > tap Wi-Fi. Now connect to a Wi-Fi network.
2) Long-press the connection you're connected to > tap Edit.
3) Scroll down and turn off Auto Obtain IP. After you do this, you'll see more options, such as the IP address, DNS and gateway. Switch to OpenDNS or Google DNS here (as explained in step 5 above).
Unfortunately, Windows Phone 8 doesn't support changing DNS manually.
Try a Proxy
If changing the DNS does not work, you should try a Web proxy to open blocked websites. These websites simply route you through servers based in other countries, which means that you can access websites that aren't blocked in those countries.
Hidemyass and NewIPNow are two such websites. Just enter the name of the blocked website in the form and click enter. On the Hidemyass website, the free proxy is at the very bottom of the page, after a lot of links to the paid version, but just scroll all the way down and you'll see the address bar. NewIPNow lets you choose your server's location (US, UK or Canada), which may be useful for some users.


Subscribe to a Virtual Private Network
For complete anonymity on the Web and to be able to access all websites blocked in your country, a virtual private network (VPN) is the best solution. The best VPNs are not free. If you really need privacy or want to avoid proxy websites, you can try Private Internet Access at $7 (Rs. 420) per month, or TorGuard at $10 (Rs. 600) per month.
If we've missed your favourite method to open blocked websites, let us know with a comment. For more tutorials, make sure you visit our 'How to' section.


Free Website Monitor

Android App : https://play.google.com/store/apps/details?id=com.freewebsitemonitor

How to Edit PDF Files for Free on (Almost) Any Platform


Ever received a pdf file as an attachment, and wondered how to append your signature without printing it out and scanning the final copy? Or how to fix that one typo before sending it back? Of course you have.
The pdf or Portable Document Format is a popular file format that lets you view documents across platforms without disturbing its formatting. PDF files, which often house comics, novels and various bills, aren't meant to be edited. That's why it is hard to find a one-size-fits-all pdf editing solution for free. But it can be very inconvenient when you need to fill a form or add a line to a document which was sent as a pdf.
While Adobe Acrobat XI (Rs 30,000) and Nitro PDF Editor (Rs 11,000) are good apps, their cost is prohibitive for most people. Luckily, there are free alternatives on most devices now. Read on to find out how to edit pdf files without spending a dime.
On the Web (Works on Android, BlackBerry 10)
If you don't have a Windows or a Mac machine, or if you don't want to install any applications, head to PDF Buddy for basic editing tools. This website also works for editing pdf files on an Android phone, but not on iOS devices. In case you want to try the website first, PDF Buddy lets you use basic features (adding shapes, symbols, text, whiteout and highlight) without creating an account. You will have to create an account if you want to do anything useful like save or download the edited file, add images or signatures to the pdf file. You can edit up to three pdf files a month for free. The website asks you to pay $8 (roughly Rs 500) per month to let you edit an unlimited number of files.
Ease of use is PDF Buddy's strength, but it may not be the best tool for power users. Text editing options are limited to two fonts and you'll have to manually place text so that it aligns with the rest of the line. However, this may not be a limitation for those who just want to fill out forms without printing the document. PDF Buddy also lets you merge, split and share pdf files. Here is how to use it:
1. Drag a pdf file into the browser or click the Choose PDF to Edit button on the website and then select the file you want to edit.
2. Now, PDF Buddy will open the file (might take long for large files). Once it opens, you'll see a set of editing tools on the left side of the file.
3. The editing tools are fairly straightforward, since the name of each tool tells you what it does. You can choose the text tool to edit text and whiteout tool to erase text. Note that only two fonts are supported (Arial and Times). You can also highlight text, add images and signatures, using the corresponding tools.
4. Below the tools mentioned above, PDF Buddy has shapes and symbols, which you can add to your file. You can use symbols such as "thumbs up", "thumbs down" and "arrows" as bullet points or for annotations if needed.
5. Above the pdf file, you'll see arrows pointing to the right and left. Use these to move to the next or previous page.
6. When you finish editing, hit the Save button at the top of the page. This will save a copy of the file on the website. If you want to save it on your computer, click the Download button that's next to the Save button.


For desktops and laptops
For those who use Windows, Mac or Linux, LibreOffice Draw may be the best programme for editing text in pdf files. LibreOffice is a full office suite and you'll have to download the setup file for the whole suite to use Draw. Fortunately, during installation the programme lets you select the software you want to install. This means that you can install Draw without installing all the other apps in the office suite. Like PDF Buddy, Draw is easy to use. Follow these steps and you should be able to edit pdf files easily. Note that these steps are for the Windows version of Draw, but the process is similar for Mac and Linux.
1. LibreOffice Draw can open pdf files without any configuration. All you have to do is press Ctrl+O or click File > Open, and select your pdf file.
2. All the tools are laid out at the bottom and should be familiar to anyone who has used MS Word. Click on the line you need to start editing and get to work.
3. Before you get to editing, note that LibreOffice Draw can make formatting go haywire. We imported a pdf file with bullet points, symbols and underlines. Draw moved all of these and it took us a lot of time to restore these to their original positions.
4. To align various elements, just click and drag to move them.
5. As long as your system has the font used in the pdf file, text editing is fairly easy. All you need to do is select the text you want to edit and start typing. Each line of text, bullet point, underline, etc. appear as an object in Draw.
6. When you finish editing, select the Export as PDF option in the File menu.

Using a word processing app
Another way to edit pdf files is to convert them to a more edit-friendly file format. Websites such as PDFtoword or PDFonline. PDFtoword also lets you convert pdf files to Excel and Powerpoint formats. This lets you edit the document in an app like MS Word, and then save it again as a pdf.
1. Head to PDFonline and click on Upload a File to Convert. Select your file and upload it - this can take some time for large files.
2. When uploading is complete, the website will show you the document, along with a Download button at the top. Click this button and select Download Word file. This will save the document as an rtf file, which can be opened by most text editors including Microsoft Word. Open it and make the changes you wanted to. In case you see a yellow band with the words "Protected View", then you will need to click on Enable Editing first.
3. When you are done editing, you can save the document as a pdf file. In Microsoft Word, click File > Save as and select PDF as the file type from the "Save as type" drop down menu under the filename. LibreOffice has a Export as PDF option in the File menu.
This method works best when the data on the pdf file is in a format that suits the format you choose to convert it to. For example, you are bound to face formatting issues if you try to convert a heavy pdf file with several images to Word format.
While the Web-based method works best, if you want to convert files without an Internet connection, you will have to download the PDF to Word converter software for Windows.

iPhone and iPad
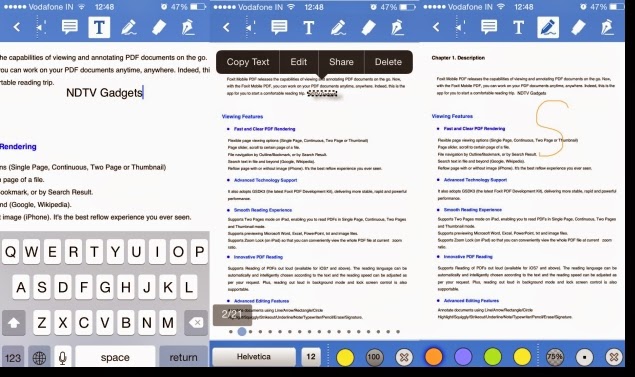
Unfortunately, there are no good, free pdf editing tools for you. The closest thing to a free pdf editor on iOS is Foxit Mobile. It's free to download and you can try all its tools on a couple of sample pdf files that come with it. The catch is that the app asks you to pay Rs 60 each for Dropbox, SkyDrive or Google Drive support. You can edit as many pdf files in the selected cloud account after that. If you want to create a new pdf from photos and text on your iOS device, you'll have to shell out Rs 60 more as a one-time purchase. Here's how to use Foxit on your iOS device.
1. Open your pdf file and select the pencil tool at the top. Now, all editing tools will appear at the top.
2. Select the tool you need (text, drawing, eraser or comment) and start editing.
3. When you finish editing, hit the back button at the top-left. Then select the export button (a box with an arrow pointing out of it) on the top-right to save or share the edited file.

Did you find this guide useful? Which is your favourite software to edit pdf files? Drop a comment to let us know

How to Stop Google From Tracking You on the Web


You probably know that websites keep track of how you're using them, and even the sites that don't require you to sign up with an account can keep a track of your preferences and behaviour using cookies. But the biggest networks, like Google, and Facebook, keep tracking you even when you're not signed in and follow you around the Internet to serve you with "relevant" advertising and content. And since most of us will have signed up for at least one of Google's many popular services, that's the company that has the most information. Not everyone is comfortable with the idea of one company knowing so much about them. If you're one of these people, read on to find out how to minimise Google's tracking online.

Please note that this is not a guide for blocking advertisements. You will still get served advertising - it just won't be personalised by tracking your online behaviour across the web. Here's what you need to do:
Disable Tracking
This is the most important part of this guide. If you've noticed the same ads following you no matter which website you visit, it may be because Google is tracking you. Thankfully, Google makes it very easy to disable tracking. Go through these steps to protect your privacy.
1) Google has a page for advertisement settings. Visit it and sign in.
2) Here you will see two columns, one for advertisements you'll see on Google's websites and one for the advertisements you'll be shown on the Web. Based on your data, Google will have estimated your gender, age, languages you speak and your interests. Scroll down to Opt-out settings and click Opt-out in both columns. You'll notice that the data above will be replaced by N/A.
3) Google's advertising cookie is still tracking you. To remove it, head to the Advertising cookie opt-out page and click Download the cookie opt-out plugin. This plugin is available for Chrome, Internet Explorer and Firefox. After downloading this plugin, Google will stop tracking your browsing activity.

Disable Search History
While that stops the direct tracking, Google is still gathering a lot of information about your behaviour. Whether you're using Gmail, or YouTube or Google itself to search for things, you're giving the company a clear trail of browsing data. The good news is that you can stop it from doing so easily. This is how:
1) Head to Google's account history page and sign in.
2) You will see four large cards (Things that you search for, Places you've been, Your YouTube searches, and Things that you've watched on YouTube). Each one of these will have a Pause button near the bottom-right and a Manage history link on the bottom-left.
3) Click Pause on all four tiles. This will stop Google from recording your personal data.
4) To remove the data that Google has already recorded, for each tile, click the Manage history link, then select the items, and click on "Remove items" to delete it all.

Disable Shared Endorsements
Last year, Google unveiled a new way to make advertisements more appealing - showing your Google+ activity next to advertisements. Here's what Google says about this, "To help your friends and others find cool stuff online, your activity (such as reviews, +1's, follows, shares, etc.) may be used along with your name and photo in commercial or other promotional contexts." If you'd rather not endorse products or services in advertisements posted on the Web, follow these steps.
1) Go to Google's shared endorsements settings page and sign in.
2) Now scroll down to the bottom and remove the uncheck the box that reads, "Based on my activity, Google may show my name and profile photo in shared endorsements that appear in ads."
3) Once you've removed the tick-mark, click the blue Save button. That's it.

For Android, iOS Users
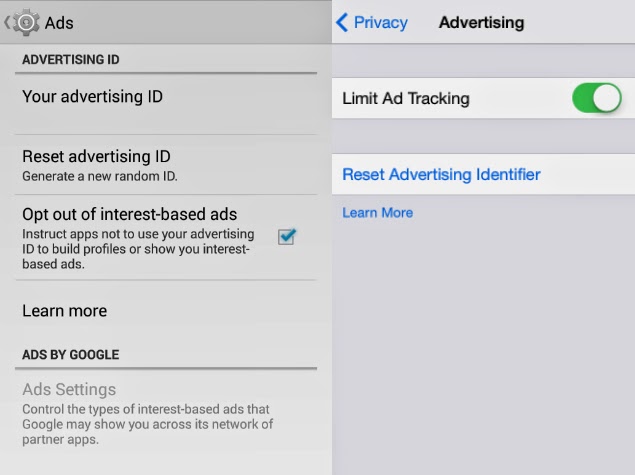
If a smartphone or tablet is your preferred device for browsing the Web, you can take a quick peek in its settings to disable tracking. On Android, head to Settings > Accounts & Sync > Google > Ads (on some devices, Google may appear in the Settings app itself). Now make sure that there is a check-mark next to Opt out of interest-based ads. On iOS, go to Settings > Privacy > Advertising and turn on Limit Ad Tracking. This will stop websites that serve advertisements from tracking your browsing activity.

Switch from Google
Still worried about your browsing history being tracked to deliver search results on the Web? Try DuckDuckGo, a search engine that respects your privacy. It doesn't tailor search results based on your interests or the websites you frequent. DuckDuckGo recently added several new features such as instant answers. Apple's iOS 8 supports DuckDuckGo and users will be able set it as the default search engine on their iOS devices.

These steps should have helped you keep Google from tracking your Web activity. If you have any other suggestions, reach out using the comments section below. If you like this article, you might want to visit our How to section for more such useful articles

How to Install Multiple Apps on Android, iOS, Windows, Mac, and Ubuntu


You've got a new iPhone, iPad or any other gadgets and you're very excited about it, but before you can begin using it properly you'll have to spend hours installing all your favourite software. If you could automate the installation process, you'd save a lot of time and get straight to doing what you bought the machine for. Here are two great services that let you quickly install a lot of apps on Windows and Mac and two tricks to do the same on Android and iOS devices.
Windows and Ubuntu
If you use a Windows computer, you must try Ninite. We tried a few other alternatives and found that these apps try to serve too many ads, sponsored apps, or run in the background in your system. Ninite is free, has no ads and gives you a single exe file that you can delete after installing all your apps. That is why it is better than the alternatives. Windows machines that have never been formatted or restored to factory settings are rare. Windows also happens to be the operating system on a large number of new computers around the world. In a nutshell, a lot of people are spending a lot of time installing the apps that let them make the most of the operating system. If you want to make it a single-click, hassle-free process, follow these steps.
1. Go to Ninite and scroll down. You'll see several apps in categories such as Utilities, Browsers, etc. Ninite lists several great, free apps for Windows such as Glary Utilities, VLC Media Player, Avast anti-virus, Dropbox and LibreOffice. The Ninite home page has the full list of apps sorted into categories such as browsers, messaging, media, imaging, security and more. Most people won't need any app other than the ones listed on Ninite.
2. Select all the software you need by checking the boxes next to them > click the big green Get Installer button.
3. Ninite's installer (usually less than 1MB in size) will begin downloading now. Once that's done, run it. It will automatically start downloading all the apps and install them. Ninite also removes all the adware (toolbars, search engine defaults, etc.) that some apps try to make you install. This only works for desktop apps, not Windows 8 style apps.
Ninite is also available for Ubuntu Linux, but the selection of apps is a lot smaller than Windows.

Mac
Unlike Windows users, those on Apple's Mac operating system get a good collection of pre-loaded apps. Yet, if you want to quickly install some of the most popular third-party apps on Mac, these steps will help.
1. Open Get Mac Apps > select the apps you need > click "Install These!"
2. This will generate a command. Copy it.
3. Open Terminal. If you don't know how to do this, hit Cmd+space > type Terminal > press Enter.
4. Paste the code in Terminal > hit Enter.
5. That's it. In case you're wondering whether Get Mac Apps has good apps, the collection is quite good - featuring free apps such as Flux, Skype, VLC, Handbrake, Dropbox, Evernote and Notational Velocity, among others.
Note that both Ninite and Get Mac Apps use the official sources of the apps, so they are safe to use.

Smartphones
You can also install multiple apps easily on smartphones, but these methods will not work if you want to install new apps. They work only with apps you've previously installed or purchased from the same Apple ID or Google account. This method is useful if you have a set of essential apps that you always install every time you get a new device, but not if you are using a new Apple ID or Google account.
Android
If you have an Android device, just go through the following steps to install several previously installed apps quickly.
1. Open Google Play Store > tap the three horizontal lines on the top-left > My Apps > All.
2. Tap and hold any app that doesn't have "Installed" written next to it. This will select the app. Now scroll down and select all the previously purchased apps you want to install > tap the Install button at the top.
3. All these apps will now be installed, though you will have to negotiate through the permission screens for each app and approve it individually.

iOS
Unlike Android, iOS doesn't have an option where you can select all previously purchased apps and do a one-tap install. But Apple's method is much faster. Check these steps and see it yourself.
1. Open App Store > tap Updates > Purchased.
2. The apps you have installed will have an "Open" button next to them. The ones you haven't installed will have a cloud icon with an arrow pointing downwards. Tap that icon for all the apps you want to install and your iOS device will start downloading them - no password required.


These methods are great for quickly setting up your new device, but if you prefer any other ways or services, let us know with a comment. We have more useful tutorials in our How to section, which you might want to visit.