Showing posts with label Google Chrome. Show all posts

How to Enable Guest Mode in Google Chrome


Google Chrome is one of our favourite browsers on iOS, Android and Windows. We like it because it works well and allows you to easily import your preferences and other browser data across platforms. While there's no doubt about how useful this feature is, it can become a problem if you're not the only one using your computer.
If someone else takes your phone or computer and starts using Google Chrome, that person will have access to all your saved passwords. Another problem is that if you, like us, have spent some time setting up Google Chrome to suit your needs, then you might not want anyone else to change things. If you're signed in to Google Chrome via the same account on two devices, you remove an extension on one computer and it disappears on the other too. So it's not too hard to imagine a situation where someone deletes a whole bunch of important bookmarks and extensions, leaving you to set up the browser again.
In order to avoid this, you can enable guest mode in Google Chrome before handing your machine over to someone. This lets others use Google Chrome without messing around with your browser preferences. Here's how to enable it.

Windows and Mac
The steps to enable guest mode in Google Chrome are the same for Windows and Mac users.
  1. Open Google Chrome.
  2. On the top-right, you will see the name of the person whose Google account the browser is linked to. Click the name.
  3. Click Switch person.
  4. Click Browse as Guest.
  5. This will open a new window where you won't be able to access any of your browser data. Guest mode is like incognito mode, which doesn't save browser history or cookies. The only difference is that you can't even access bookmarks or other preferences.
Unfortunately, the solution isn't as straightforward on Android or iOS. The method described below is a bit cumbersome but it's the best possible way to do this as of now.
iOS
Follow these steps on Google Chrome for iPhone and iPad.
  1. Open Google Chrome.
  2. Tap the three vertical dots on the top-right.
  3. Tap Settings.
  4. Your Google account name and email address will be right at the top. Tap it.
  5. Tap Manage Accounts.
  6. Tap Use Chrome without a Google account.
  7. This will stop synchronising Chrome data on your iOS device with your Google account. Now on your iOS device, you can clear bookmarks or any other browser data you don't want others to change.
  8. When the other person has returns your iOS device, you can quickly get back all your data by signing in to your Google account again. Just follow steps 1-5 and then select your Google account or tap Add another account and sign in.
Android
  1. Open Google Chrome.
  2. Tap the three vertical dots on the top-right.
  3. Tap Settings.
  4. Tap your Google account name and email address that appear right at the top.
  5. Tap the blue button at the top to turn sync Off.
  6. This will stop syncing your data with your Google account. Now you can clear any preferences on Google Chrome for Android without disturbing the carefully configured settings on other devices.
  7. When you don't need guest mode anymore, you can quickly enable sync by following steps 1-4 and then tapping the button at the top to turn sync On.
For more tutorials, visit our How To section.

How to Disable Notifications in Google Chrome


Desktop notifications are one of the best features of modern browsers. They show previews of email, football scores or even instant messages, letting you to take a quick glance at updates without leaving the work you're doing. But this can get a little overwhelming, particularly when it includes spam and advertisements. If too many sites have begun to send notifications, or if you need to shut out all the noise, you should disable Google Chrome notifications. Doing so is pretty simple:
  1. Open the Google Chrome Settings page. You can either type chrome://settings in the address bar and hit Enter or click the hamburger icon at the top right > Settings.
  2. Scroll to the bottom and click Show advanced settings.
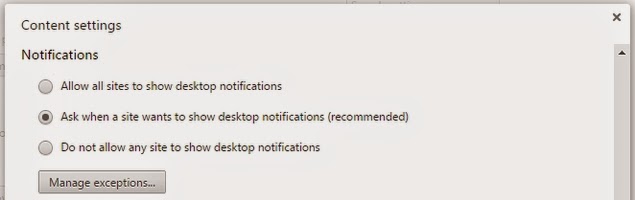
  3. Under Privacy, click Content settings....
  4. Scroll down to Notifications.
  5. Select Do not allow any site to show desktop notifications.
  6. If you want to allow some websites to show notifications, you can click Ask when a site wants to show desktop notifications. Now sites will show notifications only if you permit them to.
  7. Click Manage exceptions... to see the list of sites that you've granted permission for notifications. Click the X to the right of any of these URLs to stop the site from sending notifications.

This method gets rid of desktop notifications from websites. But an app or extension can still send notifications. To disable notifications from individual Chrome apps or extensions, follow these steps.
Windows 7 and 8
  1. Tap Windows key + D or go to the desktop.
  2. Left-click the bell shaped Chrome Notifications icon in the notifications bar in the bottom-right of the screen. If it isn't there, then click the up arrow icon at the start of the notifications bar. Once you see the bell, left-click on it.
  3. Click the gear icon.
  4. Uncheck apps or extensions that you don't want notifications from.

Mac
  1. In the system menu bar, click the bell icon.
  2. Click the gear icon.
  3. Uncheck apps or extensions that you don't want notifications from.
If you want to disable all Chrome notifications, there is an easy way to do so. In case you're working and just want a temporary break, then you can instead right click on the bell-shaped Chrome notifications icon, and click on Do not disturb. This turns off all notifications. You can also click on Do not disturb for one hour or Do not disturb for one day if you just want a short break from notifications.
This next method will permanently stop all notifications, including email and messages. If you need those, then do not do this. If you're certain that you need to get rid of all Chrome notifications, then read on.
Windows 7 or 8
  1. Tap Windows key + D or go to the desktop.
  2. Click the up arrow icon at the start of the notifications bar in the bottom-right of the screen.
  3. Click Customise....
  4. Scroll down to Google Chrome.
  5. In the drop-down menu, select Hide icon and notifications.
  6. Click OK.
Mac
  1. Click Chrome from the top menu bar.
  2. Click Hide notifications Icon from the drop-down menu.


Once you've done this, Chrome will no longer be able to send any notification or alerts at all. Which annoying websites or extensions were spamming notifications on your computer? Let us know via the comments. For more tutorials, visit our How To section.

How to Stop Google and Other Services From Tracking Your Location


When you're using a map app to find your way around, or if you want to check in to a location on Facebook to tell your friends where you have been; then location tracking is useful and seems benign. But apps and services can keep tracking your every move, and this can be a serious privacy issue. And aside from everything else, this also uses up your battery a lot faster than is ideal. If you don't want companies to track you, read this guide and disable location tracking on your devices when you don't need it.
Google
You may not know it but Google tracks your location history unless you disable it yourself. It gathers this data from your usage of Google Maps. You can disable this, and even manually delete certain places from your location history. Here's how.
1. Go to this Google settings page.
2. Click the Pause button in the "Places you've been" tile on the right. To delete individual entries from location history, click Manage history.
3. You can pick any date from the calendar on the left > click Delete all history from this day. If you don't want any of your location history tracked, just click Delete all history.
(Also see:How to Stop Google From Tracking You on the Web)
Android
Turning off location settings on your Android phone is pretty easy, but it can affect the functioning of some useful services. Google Now for example relies on location data to provide you information you need without you even searching for it. If you still feel that you'd rather not report your location to Google, follow these steps.
1. Open Settings > scroll down to Location > Google Location Settings.
2. Now tap Location reporting > Off.
3. Go back, tap Location history > Off. You may also want to tap the "Delete location history" button below.


iOSSeveral apps and system services use your location on iOS to provide features such as apps popular in your locality and even to serve advertisements based on the place you are in. Here's how to disable all of that.
1. Open Settings > Privacy > Location Services.
2. The first option is to turn Location Services on or off. You can turn it off to disable tracking entirely, but that will mean that you will have to do several things, such as search for weather data, manually.
3. Scroll down to see which apps have access to location data. You can decide which apps don't need it and turn it off for that app. If you have Find My iPhone/ iPad enabled, we suggest you don't disable location tracking for that because it may help you locate your device if you lose it.
4. Scroll down to the bottom and tap System Services. Here you can disable all options except Cell Network Search to stop tracking. Tap Frequent Locations and turn that off too.

Windows 8
Disabling location tracking on Windows 8 is quite simple. This is how you do it.
1. Hit Windows key+C > click Search > type PC Settings in the search bar > click PC Settings.
2. Go to Privacy > Location > Let Windows and apps use my location > Off.
BlackBerry 10The BB10 operating system makes it easy to prevent tracking. Just follow these steps.
1. Open Settings > scroll down to Location Services > turn off Traffic Data Collection and Location-based adverts. You may turn off Location Services entirely in the same place.
2. If you just want to disable location access by specific apps, go to Settings > App Manager > tap "Go to the Application Permissions screen to change permissions for individual apps".
3. Now tap Permissions > select Location > tap any app that you want to cut off from using your location > Off.
That should have helped you disable location tracking on any device. If there's any other way to disable location tracking that you prefer, let us know with a comment. As always, our How to section (http://hemanthsomaraju.blogspot.in/) will help you find more useful articles.
Web BrowsersIf you use a desktop or laptop to browse the Internet, you can disable location sharing in your Web browsers. Note that websites may still be able to identify your location using your IP address, but they will find it much harder to zero in on the place you're browsing from. Here's how you can disable it.
Google Chrome
1. Click the Google Chrome Menu icon (three horizontal lines) > Settings.
2. Now scroll down and then click on Show advanced settings >
Content Settings 3. In the pop-up, scroll down to the Location section > Do not allow any site to track your physical location.

Mozilla Firefox
1. Type about:config in the address bar > hit Enter > click I'll be careful, I promise.
2. Search for geo.enabled and double-click it to change its value from 'true' to 'false'. This will disable location sharing.

Opera
1. Click the Opera button on the top-left > Settings. Alternatively, you may use the Alt+P keyboard shortcut.
2. Click Websites on the left sidebar > scroll down to Location > select Do not allow any site to track my physical location.

Safari
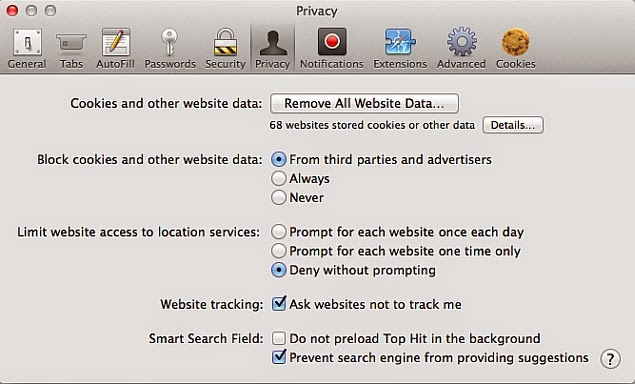
1. Open Safari > Preferences > Privacy.
2. Click Deny without prompting.

Internet Explorer
1. Go to Tools > Internet Options, or use Alt+X.
2. Click Privacy > check Never allow websites to use your physical location.


Windows Phone
There isn't one place where you can easily disable specific background tracking without disabling location services entirely in Windows Phone. Here's what you can do if you don't want to turn off location services.
1. Head to Settings > swipe right to Applications.
2. Manually open each app here and disable location wherever it is an option.
3. Swipe left (back to System) > WiFi > Advanced > uncheck Send information about WiFi connections to help discover nearby WiFi.
4. Head back to System > Feedback > Off. You can also go to Settings > Find My Phone > Off but that is a useful anti-theft feature that you may not want to turn off.
For a more thorough option, open Settings > Location > Off.

That should have helped you disable location tracking on any device. If there's any other way to disable location tracking that you prefer, let us know with a comment. As always, our How to section will help you find more useful articles.

Never Pay MRP: 3 Browser Extensions That Will Help You Save Money


Today, just about every major e-commerce player has daily deals, flash sales, and price cuts in a bid to encourage shopping. However, buying anything without comparing the price across various stores is usually a bad idea. Having said that, we know that checking every site manually can be a pain.
Enter price comparison websites like Junglee, which help you find great deals. However, the experience is far from seamless and going back to the site, every time you can come across a deal on an e-commerce store can be a pain.
In such situations, browser extensions do the job without interrupting your browsing flow. We tried different extensions that find the best deals across several Indian e-commerce websites and here are our favourites:
Makkhichoose
Named after a Hindi phrase that roughly translates to "penny pincher", Makkhichoose is a Chrome and Firefox extension that adds a button to product pages of shopping websites. When you go to a product page on leading e-commerce sites, you'll see a blue button in the corner of the page.
Clicking this button will tell you if other websites have a better deal on the product that you are currently browsing. This extension checks prices of the same product on Flipkart, Amazon, SnapDeal, Tradus, Saholic, Yebhi, Shopclues, Myntra, and Jabong.


If a better deal is available elsewhere, the extension adds a line of text under the product name, saying: Lower price available on another site! Click on tag at bottom left to see. This tag appears on the left side, not bottom-left, and half of the icon is sometimes outside the screen. Click the tag and Makkhichoose will show you deals on other sites, along with a couple of sponsored links.
We love MakkhiChoose, but it sometimes finds the wrong product. For instance, we searched for the comic book Boxers by Gene Luen Yang and MakkhiChoose said SnapDeal has the book for Rs. 300 while most others had priced the book at around Rs. 1,500. We clicked the link very happily, but then discovered that the product was boxers style underwear.
(Also see: How to Save Big on Windows Phone, BB10, Windows, and Mac Apps)
PriceKart
PriceKart does the same thing as MakkhiChoose, but has a much better interface and some extra features. PriceKart shows you three buttons - Price Alert, Check Price, and Coupons. The Price Alert button adds the product to your watch list and sends a notification when there is a price drop.
The Check Price button is for comparing prices across websites, similar to MakkhiChoose, while the Coupons button shows discount coupons for the product. When you checkout, a big Apply Coupon button appears, which automatically checks various coupons available online, and selects the one that will give you the maximum discount.

PriceKart checks prices across several websites including Amazon, Flipkart, SnapDeal, Crossword, Landmark, Naaptol, Myntra, Zovi, Jabong, and eBay, among others.
PriceKart is a very useful extension, and we prefer it over Makkhichoose due to the extra features - but if you want something that is fast and no frills, you might disagree.
(Also see:How to Save Money on Google Play Store Apps)
Compare Hatke
If Makkhichoose and PriceKart are too basic for you, we suggest that you try Compare Hatke for Chrome and Firefox. It does everything that the other two extensions do, but has a bigger database of websites and also shows you price vs. time graph for most products, so you can see, for example, if a product frequently goes on sale.
Install this extension by Buyhatke, search for a product across 70 Indian e-commerce sites, open any product page, and wait for a few seconds. A bar will appear at the top where you will be shown prices on other websites. However, the process isn't flawless - there were some pages where the top bar did not appear at all, even though the product was listed as available on various sites.

You will also notice two more buttons on the product page - Price too high? Watch Price, and Compare. The first button adds the product to your watch list and will send a notification when there is a price drop. You can find all products in your watch list by clicking the extension's button, which is next to the address bar. The Compare button takes you to the Buyhatke website, which is like any other price comparison website.
The best feature of this extension is a neat price vs. time graph that appears below any product page. This historical graph see the product's price over the past month. In one case, we saw that a product worth Rs. 1,500 was available for Rs. 299 for three days before its price rose again. If you're a compulsive deal-hunter, this is a great feature.
The extension also shows a big Apply Coupon button during checkout. When you click this button it applies several coupons and picks the one that offers the maximum discount, similar to PriceKart.
Compare Hatke is a great extension, but it has a couple of minor issues. As mentioned earlier, sometimes the top bar doesn't appear at all and we found that the buttons it adds to product pages can get distracting.
(Also see:How to Find the Best Deals on iOS Apps)
These three extensions are all very useful, but there are always more. If we missed your favourite addons or if these extensions saved you some dough, let us know via the comments.

How to Block Any Website On Your Computer, Phone, or Network


There are several reasons why you might want to block certain websites on your computer. Some websites could be spreading viruses, contain explicit content or even be trying to steal your personal data. While you may well be more than capable of avoiding these websites, but that doesn't stand true for every one who uses your device. In such cases, it might be best to block certain websites.
There are different ways to go about blocking websites. You can choose to block websites only on specific browsers, the entire operating system, or indeed your network router. Here's how to block websites.
On your computer
If you want to control access to websites on just one machine, then you can set up block at the operating system level. This method for blocking websites is not too hard to configure and will work across browsers.
Windows
One of the backbones of the Internet is the DNS system that translates easy to remember (and type) names such as www.google.com into equivalent IP addresses (8.8.8.8). While you use DNS servers to get to websites, your computer also has something called a HOSTS file which can have this information stored locally. This can be used to disable access to unwanted websites. We checked this method with both Windows 7 and Windows 8.
1. Make sure you have administrator access on your computer. Sign in to your PC using an administrator account and go to C:\Windows\System32\drivers\etc\
2. Double-click the file named "hosts" and select Notepad from the list of programs to open the file. Click OK. The last two lines of your hosts file should read "# 127.0.0.1 localhost" and "# ::1 localhost".
2a. In case you can't edit the file, you'll need to right-click the file labelled hosts and select Properties. Click the Security tab, select the administrator account and click Edit.
2b. In the pop-up, select the account again and check Full control. Click Apply > Yes. Now click OK in all pop-ups.
3. At the end of the file, you can add the addresses of websites to block. To do this, just add a line at the end of the file, with 127.0.0.1 and then the name of the site you want to block - this will redirect the site's name to your local computer.
4. To block Google, for example, add "127.0.0.1 www.google.com" to the end of the file without the quote marks. You can block as many sites as you want this way, but remember you can only add one per line.
5. Repeat this step until you've added all websites you want to block.
6. Now close the hosts file and click Save. Reboot your computer for the changes to take effect and you'll find that all those websites are now blocked.

Mac
Here's how to block websites on OS X .
1. Make sure you have administrator access to your Mac. Now open Terminal. You can find it under /Applications/Utilities/Terminal.
2. Type sudo nano /etc/hosts and press enter. Enter the user (login) password when prompted.
3. This will open the file /etc/hosts in a text editor. Type the name of the website in a new line in this format "127.0.0.1 www.blockedwebsite.com" (minus the quotes). For each website you want to block, start a new line and type the same command with only the name of the website being replaced. When done, press ctrl+x and then Y to save changes.
4. Now key in the command sudo dscacheutil -flushcache and press Enter or restart your machine to make sure the websites are blocked.
Browser-level blocks
Blocking a website on any browser is the easiest way to get the job done.
On Firefox, you can install an addon called BlockSite to block website.
1. Install the addon, press ctrl+shift+a, and click Extensions on the left. Now click Options under BlockSite. In the pop-up, click Add and type the name of the website you want blocked. Repeat the process for all websites you don't want to access. Click OK.
2. Now these websites will be blocked on Firefox. You can also set a password in BlockSite to prevent others from editing the list of blocked websites. This can be done via the options menu described in the previous step.
BlockSite is also available on Google Chrome.
Internet Explorer lets you block websites easily. Here's how.
1. Open the browser and go to Tools (alt+x) > Internet Options. Now click the security tab and then click the red Restricted sites icon. Click the Sites button below the icon.
2. Now in the pop-up, manually type the websites you want to block one-by-one. Click Add after typing the name of each site. When done, click Close and click OK in all other windows. Now these websites will be blocked in Internet Explorer.
On your phone or tablet
iOS
Apple has some handy parental control tools that let you block certain websites. Here's how.
1. Go to Settings > General > Restrictions.
2. Tap on Enable Restrictions. Now set a passcode for restrictions. This should ideally be different from the passcode you use to unlock the phone.
3. After the passcode is set, scroll down and tap Websites. Here you can either choose to limit adult content, or allow access to specific websites only.
4. In specific websites only, there's a short list of allowed websites including Discovery Kids and Disney, but you can also add sites by tapping on Add a Website.
5. If you tap Limit adult content, Apple blocks websites that are deemed objectionable, but you can whitelist websites by tapping on Add a Website under Always Allow, or blacklist them by tapping on it under Never Allow.
6. If you try to access a blocked website, you see a message telling you it is restricted. Tap the Allow Website and key in the Restrictions passcode to open that website.

Android
On Android, you'll need to edit the hosts file on your device to redirect sites you want to block. You'll need a file manager, and a text editor - the easiest option is to use our favourite app ES File Explorer, which lets you do both things. Here's how it works.
1. Install ES File Explorer Open ES File Explorer and tap the "/" button at the top. Tap on system > etc.
2. In this folder, you'll see the hosts file - tap it and in the pop up menu, tap text. In the next pop up, tap ES Note Editor.
3. Tap the three dots button in the top right, and tap edit.
4. Now, you're editing the file, and to block sites, you want to redirect their DNS. To do this, just start a new line, and type "127.0.0.1 www.blockedwebsite.com" (without the quotes, where blocked website is the name of the site you're blocking) for each website you want to block. For example, you'll have to type 127.0.0.1 www.google.com to block Google.
5. Reboot your Android device.
If that method is too complex for you, you can install an anti-virus app such as Trend Micro that lets you block websites.
1. Install the app and run it. Go to Options > Safe surfing.
2. Now swipe to Parental Controls and click set up account. Create an account and you'll see an option called Blocked List in the app. Tap it, and tap Add. Now add the websites you want to block one at a time. Once that is done, you won't be able to access these websites on your Android smartphone.
Windows Phone
You can't do a full block of websites on Windows Phone, buy you can download the AVG Family Safety browser. By default it blocks websites with malicious or explicit content, and if you purchase an AVG anti-virus licence and create an account, you can customise the list of blocked websites.
On your network
If you have a Wi-Fi network in the house, then it is easier to just set up a block on unwanted websites via your Wi-Fi router. Most routers don't have very user friendly interfaces, so this can be a little daunting, and of course, the steps can vary for each router, but the basic process you follow is pretty similar, so if you're just a little patient, this is actually pretty easy.
Changing the wrong setting could accidentally de-activate your connection, so if you get stuck, call your ISP right away.
1. We tried this on a Beetel 450TC1 router provided by MTNL in Delhi, and with a Binatone Router provided by Airtel. The steps were exactly the same for both. To start, you need to go to your router's settings. Open any browser and type 192.168.1.1 in the address bar. Press Enter. Some routers use a different address, so if this doesn't work, check and see if it is mentioned in the documentation from your ISP.
2. Now you will have to enter a username and password. This would have been set up during the installation of your connection - defaults are usually username: admin, and password: password. If not, check with your ISP and get the correct username and password.
3. As mentioned earlier, the interface can differ. In our MTNL router, we found that we could block websites under Access Management > Filter.
4. Here there's a drop-down menu called Filter type selection. We selected URL Filter and typed the website we wanted to block in the URL field below. Above this field, there is an option called Active. Here we saw two buttons, Yes and No. We selected Yes and hit Save. This blocked the website on our network.
5. You can create 16 lists of blocked websites, each containing 16 websites, using this method, letting you block up to 256 websites. Again, this will vary from router or router.
This guide should have helped you block websites on almost any device. If you know any other methods to block sites, let us know via the comments. For more tutorials, visit our How to section.